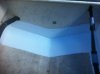
I was able to lay down a couple coats of gelcoat over the repaired section of the bulk head this weekend. The 2nd and final coat with the wax added. The white gel coat looks pretty bright against the rest of the bilge but it is going to be under the fuel tank so no matter.
Next up is changing the intermediate housing on the volvo leg. I had an old pitted intermediate housing that I had scrounged up a few years back that was used to replace the original, which had developed a crack. I've now scrounged up a non-pitted housing that we will install this week.
Then the fuel tank goes back in and then work on the floor inside the cabin. I almost forgot about the darn cabin floor which was the catalyst for all of this other work. The fiberglass guy I had lined up to do the floor has waffled out on me so it might be up to me to do it. Therefore I may be asking for more advice
Yes great work MRWood. Keep the pictures coming, I love these threads. Nice to see an older boat getting a face lift and tummy tuck, maybe even a boob job. LOL
I'm back. There is good news and bad news with my little (getting bigger) project.
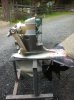
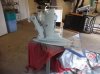
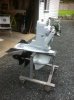
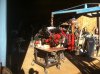
The good news is that I have the leg back and all tuned up. I had someone change the intermediate housing for me and do a little maintanance and change some bearings. I then sanded it all down and painted. All turned out pretty nice. Pics to follow.
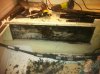
The bad news is that I found some water damage/dry rot in the area of the bilge that my fuel tanks bolts onto. This lead to some cutting and further discoveries. I believe the stringer and floor damage is limited but I will let you guys give me some advice on this. Pics to follow.
Here is a pic of the leg after changing the intermediate housing. My neighbour thought I should put it back on the boat as is but I didn't like the calicoe colour.
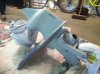
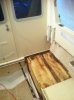
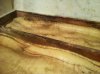
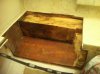
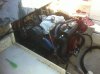
Here are some pics of the deck section I've cut out to expose the stringers and bilge sidewall stringer. The section that was wet was the bilge sidewall section. There was a glassed in 2x8 that was on the upper section of the bilge wall, this is where the fuel tank was lag screwed in. That 2x8 core was shot as well as the glassed in plywood bilge wall. Still not sure how water was getting in but it had over the years. Some water must have got in thru the lag screws I'm sure.
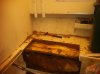
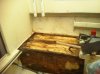
middle stringer core was dry rotted for a few feet out from back cabin wall. Better remove some foam, tried to be delicate with it but that don't work well. Just hack it out with the end of the pry bar. Foam was all very dry so that was somewhat encouraging.
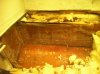
I then prceeded to cut out the rotton section of the stringer and cut down the fiberglass skin down to an inch or so above the hull. The mid stringer and bilge wall section that is left behind are all solid. Floor is dry and solid where I have cut out to. Reach my arm in there and feel around underneath the floor all is bone dry. So this is where i have gotten to.
This site uses cookies to help personalise content, tailor your experience and to keep you logged in if you register.
By continuing to use this site, you are consenting to our use of cookies.

") which was the catalyst for all of this other work. The fiberglass guy I had lined up to do the floor has waffled out on me so it might be up to me to do it. Therefore I may be asking for more advice
which was the catalyst for all of this other work. The fiberglass guy I had lined up to do the floor has waffled out on me so it might be up to me to do it. Therefore I may be asking for more advice