What Did You Do To Your Boat This Week?

Motor day for me,
After only 5yrs and 178hrs with this 357 crate engine, she through "something" ? 8 miles off shore from Beale late Thursday afternoon
Came in to Bamfield on the kicker, and son towed me back in to Port the following morning.
Now to find out what the fk let go, and get the new long block put back in when it arrives.
Good thing I wasnt smart in school and took all shop classes, can do all the work myself!
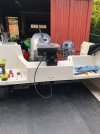
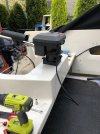
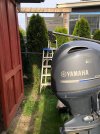
fml lolView attachment 64616View attachment 64617View attachment 64618
Took the engine apart yesterday, issue was #7 exhaust valve seat come free and pounded to bits, lucky? me not a scratch on cylinder wall.
Redoing both heads and replace piston, will lightly hone all cylinders and do all rings.
Fun, fun, fun20210426_134235.jpg
 
Last edited:
i hate seated heads, i remember in 2003 when cummins started using seats in there heads and them coming out on the dyno, makes a awful mess of things
 
Got lucky for sure, helps when you don’t ignore those horrid sounds and actually shut it off right away. Much cheaper than it could have been for sure
 
Got lucky for sure, helps when you don’t ignore those horrid sounds and actually shut it off right away. Much cheaper than it could have been for sure
A turbo blew in a new tractor I was driving yrs ago, shop guys at Inland KW said only thing that saved the motor was that I instantly shut it down
 
I just replaced the front seat pedestals with slightly higher ones so I’m not sliding up to the edge of my seat to see over the dash when I first get underway.
I have some cheap Garelick fluted pedestals for anyone doing a build/restoration currently. They are 6.5” high and fit the adjustable swivel lock and slider seat bases. There’s nothing wrong with them other than the factory bases they were mounted on didn’t sit me high enough.
 

Attachments

  • 59FD4138-03BB-46E5-BBED-D2CBD33382B6.jpeg
    59FD4138-03BB-46E5-BBED-D2CBD33382B6.jpeg
    284.2 KB · Views: 29
Well no euro transom, diesel rebuilding, fibreglass and mahogany project here!!! Just an installation of a third downrigger on the boat and enjoyment of some sunshine today!!
Everything went well I thought. The worst part was removing the sprayed in foam filling from between the splashwell coaming and cockpit facia.
There was not a huge amount of material underneath where the downrigger plate was fixed so I added a couple of aluminium angle plates as backing for now. I will fab up something better out of stainless plate when I have more time.
The rigger boom extends nicely past the main and with blowback on the downrigger line it should keep well out of the way when trolling.
 

Attachments

  • sternrigger1.jpg
    sternrigger1.jpg
    260.6 KB · Views: 369
  • sternrigger2.jpg
    sternrigger2.jpg
    281.5 KB · Views: 331
  • sternrigger3.jpg
    sternrigger3.jpg
    366.1 KB · Views: 387
Well no euro transom, diesel rebuilding, fibreglass and mahogany project here!!! Just an installation of a third downrigger on the boat and enjoyment of some sunshine today!!
Everything went well I thought. The worst part was removing the sprayed in foam filling from between the splashwell coaming and cockpit facia.
There was not a huge amount of material underneath where the downrigger plate was fixed so I added a couple of aluminium angle plates as backing for now. I will fab up something better out of stainless plate when I have more time.
The rigger boom extends nicely past the main and with blowback on the downrigger line it should keep well out of the way when trolling.
With the weight of the cannon ball on the boom and it being extended like it is that boom is going to be putting a fare amount of pressure on the engine cowling. I can see a huge wear mark coming and soon leading to it wearing a hole through and cracking it. I would put one of the Scotty extenders at the bottom of the rigger and raise it up a few inches. Or run it off to the side at an angle.
 
With the weight of the cannon ball on the boom and it being extended like it is that boom is going to be putting a fare amount of pressure on the engine cowling. I can see a huge wear mark coming and soon leading to it wearing a hole through and cracking it. I would put one of the Scotty extenders at the bottom of the rigger and raise it up a few inches. Or run it off to the side at an angle.
100%. I'm majorly plagiarising what my buddy did and will fab up an abs pole that will support the boom so it clears the cowling when weighted.
Good catch!!!
 
Also, from personal experience, the downrigger ball - unless that boom isn’t fully extended - when raised out of the water is going to act like a wrecking ball on your main motor in any type of water conditions - maybe even dead calm with people moving about in the boat.
 
Also, from personal experience, the downrigger ball - unless that boom isn’t fully extended - when raised out of the water is going to act like a wrecking ball on your main motor in any type of water conditions - maybe even dead calm with people moving about in the boat.
Yup, seen that too. In my case I intend to set up retrieval to stop with the ball below the surface. I'll spin the rigger slightly to starboard, a little push or two on the red button and pull the ball and cable in with a hook.
I've fished a season or two with a third rigger in this configuration. Not on my boat but it does work quite well if one pays attention to wtftd, takes it easy and fine tunes their technique.
 
Well no euro transom, diesel rebuilding, fibreglass and mahogany project here!!! Just an installation of a third downrigger on the boat and enjoyment of some sunshine today!!
Everything went well I thought. The worst part was removing the sprayed in foam filling from between the splashwell coaming and cockpit facia.
There was not a huge amount of material underneath where the downrigger plate was fixed so I added a couple of aluminium angle plates as backing for now. I will fab up something better out of stainless plate when I have more time.
The rigger boom extends nicely past the main and with blowback on the downrigger line it should keep well out of the way when trolling.
I guess with the built in seats putting it up where your drill index is in pic one is out hey?
 
Took mine in to Sherwood this morning to get the trim motor on Yami 9.9 replaced ... again.
2018 motor that I got late 2018. Replaced the trim motor last year under warranty.
This time it was beyond warranty but Sherwood took it upon themselves to contact Yamaha and got it covered N/C.
Thanks Sherwood!
So I figured I would get a service on it while it was there.
 
Back
Top