Project 'Bad Habits' Build

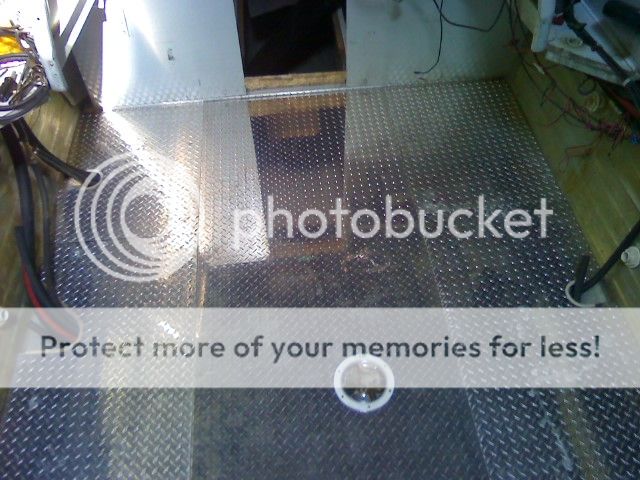
Got a few more odds and ends done on the boat. Finally finishing the floor up so that it is ready for install. The final step was to install an access hatch to get at the tank switches, that allow me to switch between my main and reserve tank.

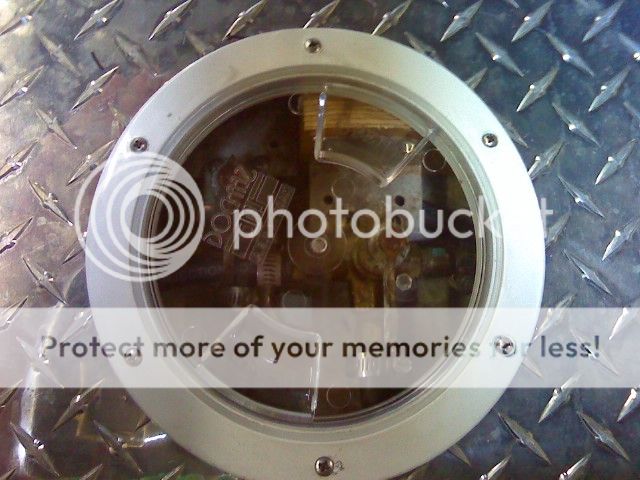
Reviewing my options in hatches, I decided to go with a round 6" hatch with a clear plastic cover. Its fairly low profile, so the 'tripping-over' factor will be minimal. I wanted to go with the clear when I saw it because it makes for very easy viewing of which tank I am running off. Just one more piece to my fool-proof fuel system.

After that it was time to get the floor sandblasted with Starblast (small ball-shot) media to give some added grip and texture...it leaves the surface of the floor similar to a fine sand paper. It may pick up dirt, but it will be slip-proof for the life of the boat, its a fishing machine, not a day cruiser so I'm not worried. I had an idea that I thought would be cool. If I could mask parts of the metal using PVC tape, I could have some bare metal still exposed in areas where the grittyness of the sandblasted floor would be troublesome. I designed the mask areas in a way so that dirt and filth would have smooth 'channels' so-to-speak that the water would flow off and towards the stern of the boat. As well I masked the area infront of the cuddy door, and at the rear where most water will be bailing into the bilge, to limit green growth and dirt build up in the areas that would be better left clean. Its a nice custom touch I'm pretty happy about and it should make it all the more fish-worthy.

I considered having a design printed and masked to the floor, but beyond straight lines it became a lesson in frustration more than anything. The blaster should have the material for a few days and then I can get it back and get on with the final floor installation.

I had mentioned using something to dampen vibration between the floor and the stringers previously. The blaster had a great recommendation...using a 40mm PVC tape to stick onto the stringers. Its a 40 year rubberized product that I think will more than do the job. Add a little sikaflex and it should be a rock solid floor!! heres a few pics of what I've just described...happy to be posting again, I HATE when this thread gets to Page2, its a blatant sign I'm being lazy!

Cheers!

Nick-FB


0817121227a.jpg

0817121227b.jpg

0830121012b.jpg
 
Hey Fb I'm having a boat build right now and I'm looking into non skid or something for the aluminum deck. My boat will have just flat sheet aluminum not diamond plate like yours. Do you think that sand blasting will do the trick? Have you tried any other kinds of non slip?
 
Lookin good FB. I gotta stop by the shop and check this beast out in person soon. Is the floor fixed in place yet or are you waiting for that stage?
 
Hey Fb I'm having a boat build right now and I'm looking into non skid or something for the aluminum deck. My boat will have just flat sheet aluminum not diamond plate like yours. Do you think that sand blasting will do the trick? Have you tried any other kinds of non slip?

The grittyness of a sandblast would offer the about the same non-slip traction on flat sheet as it would the diamond plate. Im using a media recommended to me by a marine blaster down south called "Starblast". It was a little tricky to find what media local blasters were using in their guns so rather than calling them all up, I just called a Starblast supplier (which is a product of DuPont if memory serves) and they gave me a short list of the local shops using that specific media. The reason I used this (as recommended) for ALU is unlike other medias (glass bead, silica ect) it uses smooth round steel balls that microscopically dent the ALU, rather than cut into it, as glass and silica medias do. The small dents hold less dirt and grime compared to a cutting media.

Sculpin pointed me in the right direction for this modification, and he has a few other ideas regarding non-slip options for ALU flooring...Maybe he chimes in with a few ideas to get you thinking.

I know on his boat he used the same product the military uses on its carrier decks. Its heavy duty stuff and works like a hot damn! The only downside I could see is maintenance of the coating (which is very very minimal, its TOUGH!) and the wieght it adds. Cutting down on wieght is an important thing for me with my build, so if I can avoid a few gallons of wieght in paint by sandblasting, then I likely will. I know some of the guides on here also use the industrial non-skid rubber-ish flooring that just lays down over you exsisting floor.
 
Lookin good FB. I gotta stop by the shop and check this beast out in person soon. Is the floor fixed in place yet or are you waiting for that stage?

Floor is currently at the blasters, should have it back by Mon/Tue the latest I reckon. I need to weld 2 floor supports back on (they cracked off in 1 place) prior to laying the floor. But that shouldn't take more than a few minutes once the welder is warm. Once that is done I can lay the 40mm PVC tape im using to dampen vibration between the floor and stringers, and start screwing the sucker down!

OH I best not forget to run my fuel sender wires before I do that. Anytime you want to pop by TS I have lots of tools and tool fuel (beer) at the ready ;)
 
I wonder if you are using steel balls if your going to get little bits of steel in the deck that will rust? When I have used steel tools on stainless I would always end up with rust marks from them.
 
I had a sample piece blasted over a month ago and there is no signs of rusting yet. The PSI blasted is on the lower end (70-ish) so I dont think it has the power to embed material in the ALU. I haven't put it to the true test but I can only assume from the source that recommended the method that it will be problem free.
 
I had a sample piece blasted over a month ago and there is no signs of rusting yet. The PSI blasted is on the lower end (70-ish) so I dont think it has the power to embed material in the ALU. I haven't put it to the true test but I can only assume from the source that recommended the method that it will be problem free.

That's how I read into the procedure as well Nick. Chaps does this for a living and knows his boats for sure.

Floor is looking good buddy. Are you going to try to seal the edge where the deck meets the inside wall of the hull to direct water to the back?
 
Are you going to try to seal the edge where the deck meets the inside wall of the hull to direct water to the back?

You betchya, going to seal the edges and the seems where 2 floor pieces meet so it all goes to the transom and engine bay.

Just picked up the flooring already from the blaster. It looks pretty awesome. I made a mistake earlier in mentioning they were using Starblast with the steel balls. They used another starblast media that is meant for ALU, because as JAC mentioned, the steel balls would likely leave particles and cause rust. Will be installing after or during the weekend...sweeeet
 
Ignoring my last post and my "after the weekend" plans for installation.....a month and a half later I finally tied up all the loose ends under the floor and was as prepared as I was going to be to screw the floor down once and for all, for hopefully the first and last time within the next 15 years...
Every project I start with this boat is a new to me project so sometimes I have a hard time getting over the mental hump of knowing I covered everything prior to moving onto the next step. This is truly what slows down this build the most for me...I have roughly 80% of the material on hand (excluding the motor) to finish the build but some parts taking longer than others before sinking in those last screws.

All that being said, I sunk over 120 screws into this floor (every 6" or so) and it is pretty rock solid! Had one minor scare sitting on the couch last night, where, going over all the gas lines ect that weave through the stringers and crossmembers in my head, I was worried that 2 screws in specific may have found a gas line. A restless sleep later and into the shop this morning, I found them to be well clear of the gas lines and could continue with the final screws as planned. One last issue with a shat batch of #8 stainless screws (the heads kept popping off) and I'm happy to say its down finally. And here is the picture to prove it!!

As mentioned I had it sandblasted for texture, but masked a few lines to give it some character and a place for water to travel to the transom easier (whether it actually does that remains to be seen lol) but for the most part, its for looks. I still need to silicone the seams and edges (too cold in the shop to do that now) but here she sits...

thanks for looking and keeping up with the build all who do!

newboatfloor.jpg
 
That looks really cool FB! Kind of like an arrow's fletching. Fast and light like an arrow. I like it:).
 
a little progress worth noting. The sides and windshield have gone to Nu Dimensions in Delta http://www.nudimensions.ca to have the windows cut out with a waterjet machine...hoping to get a video to post of the machine in action!

I've cut the side and windshield framing as well, have yet to tack it together but that will hopefully start by weeks end, pending an 'intro to aluminum welding' with Kanuckle Head. Will get some pics of the frame work once I get the parts back from Nu Dimensions. Once I have them, I can start putting the sides and windshield together, and close it all in with the roof structure. Pretty exciting progress for me...I can't see the light at the end of this tunnel, but I feel I'm definitely moving closer to it.

Cheers,

FB


Nice stuff FB. Getting all fancy with the water jetting lol. I would have been skill sawing and jig sawing the corners lol. What kind of windows are you putting in? Diamond seaglaze type with the aluminum frames or rubber frames?

Sounds like your moving right along which is cool! I can't wait to see how that cabin looks on her.

Cheers,
John
 
I think everyone would like to go Diamond, but I will be having the simple rubber trim with safety glass installed locally. Decided to not go with sliding windows on the side for the reason that when you are sitting in the helm or passenger chair, with the design of the cabin, one has to simply lean back a little bit and you look around the side of the cabin from where you sit. That and since I am leaving the bulkhead open and not enclosed, there will be good airflow throughout...

As far as the waterjet cutting, its nice to know it will be precise....as straight as i THINK I can cut with my skil saw, I still typically run an 1/8 to 1/4" out over 5 feet or so...the saw is a POS but it gets it done for the rougher cuts. But for the windows, me likes da Jet!!

-FB
 
Big day big day! My windows have been cut out of the sides of my cabin...a big step in the project to get things moving forward in a BIG way!

So the guys at NU Dimensions in Delta went above and beyond in squeezing this rather meager job onto the table of their high end water cutting machine. I can't say enough about this shop. Great guys, professional, and top notch work.

Here are a couple of videos of the work that was done. On top of the windows, they went the extra mile and made something a little special for me...a cut-out of my boats name, "Bad Habits"...I am still talking about how cool this thing is!! Sean, you the man!!

Thanks very much for the great work guys!

Name Plate:

[dJZ9A3SFf38] http://www.youtube.com/watch?v=dJZ9A3SFf38

Windows being cut out:

[ijBShE8KzHA] http://www.youtube.com/watch?v=ijBShE8KzHA
Cheers!

FB

To follow:

Kanuckle Head will be helping me with welding tonight!!!

Big Thanks to Sean and the rest of the staff @

Nu Dimensions - http://www.nudimensions.ca
Email: info@nudimensions.ca
Phone: (604) 940-3984
Fax: (604) 940-3981
Toll Free: 1-877-940-3984
Address: 7481 Vantage Way Delta, B.C. V4G 1C9
 
Last edited by a moderator:
hows bout now?? We're you lying in wait for these clips or what!? LOL ....its coming along John....get ready for cabin photos soon!!!
 
Nice touch with the boat name. Those water jets are the cat's azz. That is the way to go for your windows for sure. I was just bugging you about not using a skill saw lol. Have fun welding with Len. I want to see the dead soldier count in the morning ha ha.
 
Nice touch with the boat name. Those water jets are the cat's azz. That is the way to go for your windows for sure. I was just bugging you about not using a skill saw lol. Have fun welding with Len. I want to see the dead soldier count in the morning ha ha.

Many a beads and beers were laid down this evening...pictures will follow tommorrow....one minor hiccup on my behalf...the cabin tapers out towards the stern...I figured that the aluminum cabin frame would have enough flex to compensate for the tapering...not the case...that damn frame was WAY more rigid than expected. Not a big deal, I may have to cut some welds to allow the material some room to flex a little more...

But with Len on the gun, progress moved pretty damn fast. Im guessing a steady 8 hours more work will leave me with a completed cabin, sans windows. Its looking pretty sharp!

Going to try and run some beads myself tommorrow. I spent the evening studying closely as Len worked his way through the framework so hoepully, I have a shot ;)

Cheers!
 
Back
Top