23 Ft Hourston Reno

Lots of good work.
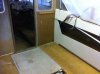
I too for the first time have a roof to work under. Makes all the difference in the world.
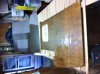
Question about the cut outs in the lower area of new transom. Can you explain that a little more
Also I always thought the stringers were to join the transom.
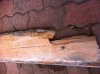
Final question when you replaced the Kealson was it flat on both sides or pointed on the bottom
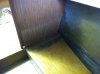
I too had holes drilled into the rear stringers inside the bildge that had rubber plugs in them.
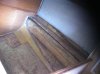
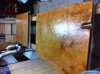
Out of the few Hourstons I've played with none had epoxy on the underside of the floor or fully encapsulated stringers
 
The cut outs are for the trimtabs to screw into I don't want anything screwing into or touching the plywood core. The stringers do touch the transom, the photo with them short was to get the transom in under the rear gunnel lip. the Kealson was shaped to the bottom and fiberglass peanut butter. All edges were routed over with a round over bit so the glass went over better. I was surprised how many things were just scabbed in from the factory. Stringers were 6" short at the back so they just scabbed a chuck in there and glassed over it, same as the gunnel selves and the counter was just anything they had. Lol. My stringers are 3/4" plywood doubled up and solid front to back. All fitted and glassed then installed and glassed to the hull.
 
A big part of the early demise of my Searay was leaking cheap inspection ports in the floor right back at the transom (and honestly they are all pretty cheap and everything leaks). So I am installing them into above deck plywood rings (combings) so the ports are above the deck and water won't sit on and can drain around the ports. Easy to do at the point you are at and a dry bilge is a happy bilge.
 
A big part of the early demise of my Searay was leaking cheap inspection ports in the floor right back at the transom (and honestly they are all pretty cheap and everything leaks). So I am installing them into above deck plywood rings (combings) so the ports are above the deck and water won't sit on and can drain around the ports. Easy to do at the point you are at and a dry bilge is a happy bilge.
I agree about the inspection ports. I installed them after I fiber glassed the floor, but before I installed the floor. Cut the holes about a 1/4-1/2" bigger then needed, installed the inspection port turned them upside down and poured resin in the space between the port and the deck boards. Any hole that needs screwing I've drilled over sized, then filled with with resin and redrilled to size. Nothing is going to be screwed or bolted so it touches the plywood core. I took special attention to all the places there was rot when I took it apart. Basically where ever the core was touched was where the rot was.
Where the stringers where drilled under the motor there was rot, which I believe started the rot on the underside of the deck which only was fiberglassed on the top. There was rot around the leg/motor collar more on the lower part. Rot all the way along the bottom where the trim tabs were screwed in, which had been moved over and remounted so 2 sets of holes. Worse was where the transducers were mounted and the bulk head that was just in front of the motor. For whatever reason that joint must of been a dry fit and did in the stringer on the port side. Also the deck under the table in the cabin
 

Attachments

  • 20150422_213912129_iOS.JPG
    20150422_213912129_iOS.JPG
    399.2 KB · Views: 92
  • IMG_1950.JPG
    IMG_1950.JPG
    548.4 KB · Views: 92
Good idea about the raised ports. I still could do that, how did you cut those out?
 
Jig saw and sand smooth, round over with a router, the fillet of filler and glass takes care of the rest.
 
Last edited:
Worked on all the trim and deck hatches this weekend. Received quite the shock when I went to go buy some teak to redo the trim, One 2"x 6"x 8' piece of Teak cost $347.00 taxes in. WOW. Needless to say I passed, will try and use the stuff I have and try and fix as much as I can and go from there. Still waiting on the arborite to cover the back cabin wall and door. Got the second coat of glass on the deck hatches and started test fitting the cabin interior back in. So far everything seems to fit. Going to rebuild the counter/cabinets and captains seating area next. Need to fit everything in, then remove and redrill all holes over size and fill with epoxy, then redrill right size. Once done I can do the gel coat and vinyl decking.
 

Attachments

  • IMG_2966.JPG
    IMG_2966.JPG
    285.2 KB · Views: 134
  • IMG_2967.JPG
    IMG_2967.JPG
    314 KB · Views: 124
  • IMG_2973.JPG
    IMG_2973.JPG
    272.3 KB · Views: 125
  • IMG_2978.JPG
    IMG_2978.JPG
    277 KB · Views: 131
  • IMG_2983.JPG
    IMG_2983.JPG
    386.6 KB · Views: 132
Nice work, more tearing apart and more ideas that will take more time for me. Gunna finally start a build thread lol.
 
Worked on the cabin bulkhead this weekend
 

Attachments

  • IMG_3019.JPG
    IMG_3019.JPG
    312.3 KB · Views: 115
  • IMG_3017.JPG
    IMG_3017.JPG
    257.7 KB · Views: 109
  • IMG_3032.JPG
    IMG_3032.JPG
    552 KB · Views: 110
  • IMG_2973.JPG
    IMG_2973.JPG
    272.3 KB · Views: 115
  • IMG_3034.JPG
    IMG_3034.JPG
    289.5 KB · Views: 118
Back
Top