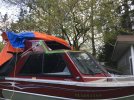
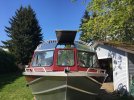
I use my boat 100% in the ocean and was getting frustrated by the occational leaking into the front of the cab at the corners of the zipper on the front canvas. We never boat with the canvas open so I decided to convert my softtop to a hardtop.
I'm just regular, everyday normal guy, and handy with most things but not and expert. The only reason I attempted this was I could tap into some resources at work (sheet metal brakes and shears and an aluminium welder)
This job took about 60 hrs (20 hrs of sheet metal shearing and forming, 5 hrs of welding, 35hrs of prep, sand, paint etc ) to complete and roughly $1000 in materials. I didn't help that I don't have a shop to fit the boat so had to work under a tarp, Jan-April.
Materials: Two 4x8 sheets 1/8 aluminum checker plate (3003 series, would prefer 5052 but lead time was 10 wks),
1" square tube for inside structure 8ft
SS 1/4" socket cap screws to bolt cap on (later changed to rivets),
Sikaflex 291i to seal/bond,
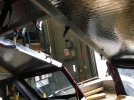
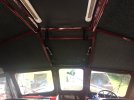
marine carpet for inside liner,
SS piano hinge for hatch,
22" gas struts for hatch,
1" thick wall dia aluminum pipe for rail and handle,
25ft of door protector, 3ft of gasket,
color matching paint.
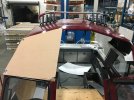
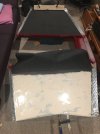
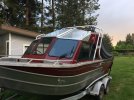
First I removed the seats and built a plywood platform to stand on. Then I removed all the snap buttons from the boat and drilled to 1/4" ( mistake I later regret). I divided the top in 5 sections, two large sections above the windows, the Hatch, one section above the hatch and the the two side pie shapes. To make the forming easier on the main panels I had to make the hatch a trapezoid shape as well so the seams line up with the front windows and the top of the cab. I overlap the front section with as much as I could to leave a small (3/16) gap between the window and the cap and I extend the overlap with 2" in the rear, the side pie shapes was to the window with about 1.25"
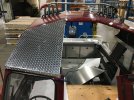
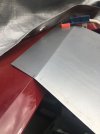
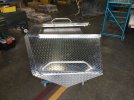
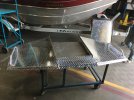
Then I took some large sheets of cardboard and mark the corners of the largest sections to help with sheering the plates out and formed them first. I also used sheet metal first just to test my angles. These are trapezoid shapes with two different angles on the front window and rear of cab. I bolted these to the cab when done. Fabed up the top section by carefully sanding it till it fit well. Then I formed up the side pie-shapes. They are really complex since the boat has a faceted side that tapers to one point at the window. I formed these first with some scrap material to make sure it can work. Next was the 1" square tubing for structure. I just ran it to the front and back of the hatch opening, I did not tie it to the boat.
I bolted all the section to the cab, then took it in for welding.
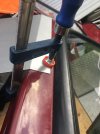
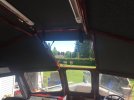
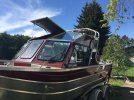
The next big job was the hatch lid. This one is trapezoid and front had to dip down to seal on the centre door in the front. Welded on some tabs for the gas struts. The hatch also has a front angle piece that I have a D shaped gasket on to seal against the front door. Then used a cheap princess auto tube bender to bend the handle and top rails. Took the hatch in for welding.
Unbolted everything and did the painting and carpeting.
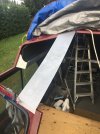
The big day was to place the cab on for the last time. I used green painters tape to prevent SikaFlex all over the boat, used the 291i to give me extra time to do the riveting.
Lessons learned: Original plan was SS hardware, but after I see what SS and aluminium and saltwater do with paint I changed to aluminium pop rivets. Unfortunately the holes were already drilled to 1/4" which is a big butt rivet, in hind sight a 3/16 would have been much easier.
Next, don't drill all the holes, ones you take that cap off it pulls and twists a bit from the welding, then you have a big fight to get the holes to align for the rivets. Drill only a few then you can drill more once you have it on.
The 1/4" rivets were sealed rivets, but they were so strong they pull through the 1/8 aluminium. So I had to use steel backing washers which I don't like.
All in all I'm pretty happy the way it turned out, my only regret is not using a Tig welder which would have made the welding look better.
I'm just regular, everyday normal guy, and handy with most things but not and expert. The only reason I attempted this was I could tap into some resources at work (sheet metal brakes and shears and an aluminium welder)
This job took about 60 hrs (20 hrs of sheet metal shearing and forming, 5 hrs of welding, 35hrs of prep, sand, paint etc ) to complete and roughly $1000 in materials. I didn't help that I don't have a shop to fit the boat so had to work under a tarp, Jan-April.
Materials: Two 4x8 sheets 1/8 aluminum checker plate (3003 series, would prefer 5052 but lead time was 10 wks),
1" square tube for inside structure 8ft
SS 1/4" socket cap screws to bolt cap on (later changed to rivets),
Sikaflex 291i to seal/bond,
marine carpet for inside liner,
SS piano hinge for hatch,
22" gas struts for hatch,
1" thick wall dia aluminum pipe for rail and handle,
25ft of door protector, 3ft of gasket,
color matching paint.
First I removed the seats and built a plywood platform to stand on. Then I removed all the snap buttons from the boat and drilled to 1/4" ( mistake I later regret). I divided the top in 5 sections, two large sections above the windows, the Hatch, one section above the hatch and the the two side pie shapes. To make the forming easier on the main panels I had to make the hatch a trapezoid shape as well so the seams line up with the front windows and the top of the cab. I overlap the front section with as much as I could to leave a small (3/16) gap between the window and the cap and I extend the overlap with 2" in the rear, the side pie shapes was to the window with about 1.25"
Then I took some large sheets of cardboard and mark the corners of the largest sections to help with sheering the plates out and formed them first. I also used sheet metal first just to test my angles. These are trapezoid shapes with two different angles on the front window and rear of cab. I bolted these to the cab when done. Fabed up the top section by carefully sanding it till it fit well. Then I formed up the side pie-shapes. They are really complex since the boat has a faceted side that tapers to one point at the window. I formed these first with some scrap material to make sure it can work. Next was the 1" square tubing for structure. I just ran it to the front and back of the hatch opening, I did not tie it to the boat.
I bolted all the section to the cab, then took it in for welding.
The next big job was the hatch lid. This one is trapezoid and front had to dip down to seal on the centre door in the front. Welded on some tabs for the gas struts. The hatch also has a front angle piece that I have a D shaped gasket on to seal against the front door. Then used a cheap princess auto tube bender to bend the handle and top rails. Took the hatch in for welding.
Unbolted everything and did the painting and carpeting.
The big day was to place the cab on for the last time. I used green painters tape to prevent SikaFlex all over the boat, used the 291i to give me extra time to do the riveting.
Lessons learned: Original plan was SS hardware, but after I see what SS and aluminium and saltwater do with paint I changed to aluminium pop rivets. Unfortunately the holes were already drilled to 1/4" which is a big butt rivet, in hind sight a 3/16 would have been much easier.
Next, don't drill all the holes, ones you take that cap off it pulls and twists a bit from the welding, then you have a big fight to get the holes to align for the rivets. Drill only a few then you can drill more once you have it on.
The 1/4" rivets were sealed rivets, but they were so strong they pull through the 1/8 aluminium. So I had to use steel backing washers which I don't like.
All in all I'm pretty happy the way it turned out, my only regret is not using a Tig welder which would have made the welding look better.