
You are using an out of date browser. It may not display this or other websites correctly.
You should upgrade or use an alternative browser.
You should upgrade or use an alternative browser.
What Did You Do To Your Boat This Week?
- Thread starter Stizzla
- Start date
sly_karma
Crew Member
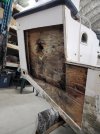
Moved my friend's Grady 232 into my shop to switch out the original 90s power for a lightly used Etec gen 1 225. Planned to do some transom cleanup and epoxy work, imcluding some holes from an old boarding ladder installed by previous owner. All went pear shaped when we saw an obvious water leak a foot to port of the outboard mount area. Probed with long 1/8 drill bit and there was nothing of substance back there.
His coming week is gonna be taken up with transom repair. We are satisfied it is restricted to port side and was caused mostly by unsealed bolts and torque from the ladder. We removed splash well drain sleeves; these have been epoxy sealed and show zero moisture damage, same for engine mounting bolt holes. Drill probe through any stb side holes produces dry wood shavings. Still a lot of work to do with little time in schedule. At least it can all be done inside and dry and warm.
His coming week is gonna be taken up with transom repair. We are satisfied it is restricted to port side and was caused mostly by unsealed bolts and torque from the ladder. We removed splash well drain sleeves; these have been epoxy sealed and show zero moisture damage, same for engine mounting bolt holes. Drill probe through any stb side holes produces dry wood shavings. Still a lot of work to do with little time in schedule. At least it can all be done inside and dry and warm.
Attachments
A question to all you experienced boat tinkerers: I have a 14' custom built aluminum drift boat that has a double floor, probably because the builder didn't want to weld seats etc onto the actual bottom and risk a weakening of the bottom structure. There is probably 2cm between the 2 floor sheets. I would like to install a foot kick board to the false bottom where my feet could push against while rowing. So it needs to be a solid connection and take lots of force and vibration. I would like to bolt through the false floor but have no access to below to attach a nut (or even less for a wrench to hold the nut). Tapping screw won't be lasting enough I am afraid. Any ideas? Is there anything like a flaring drywall anchor kind of thing that would make a mechanical connection to a bolt through the floor?
The Green Bastard
Active Member
Can you weld a nut on the topside?A question to all you experienced boat tinkerers: I have a 14' custom built aluminum drift boat that has a double floor, probably because the builder didn't want to weld seats etc onto the actual bottom and risk a weakening of the bottom structure. There is probably 2cm between the 2 floor sheets. I would like to install a foot kick board to the false bottom where my feet could push against while rowing. So it needs to be a solid connection and take lots of force and vibration. I would like to bolt through the false floor but have no access to below to attach a nut (or even less for a wrench to hold the nut). Tapping screw won't be lasting enough I am afraid. Any ideas? Is there anything like a flaring drywall anchor kind of thing that would make a mechanical connection to a bolt through the floor?
walleyes
Crew Member
You might be surprised at how well a set of good screws would last. I would go the screw rout myself unless you have access to a welder. Design the foot rest so it has a lip on each side so you can get a double row of a set of 4 screws per side for a total of 8 screws. If you use a good heavy Stainless #10 with some decent sealant that puppy ain’t going no where for the lifetime of the boat.A question to all you experienced boat tinkerers: I have a 14' custom built aluminum drift boat that has a double floor, probably because the builder didn't want to weld seats etc onto the actual bottom and risk a weakening of the bottom structure. There is probably 2cm between the 2 floor sheets. I would like to install a foot kick board to the false bottom where my feet could push against while rowing. So it needs to be a solid connection and take lots of force and vibration. I would like to bolt through the false floor but have no access to below to attach a nut (or even less for a wrench to hold the nut). Tapping screw won't be lasting enough I am afraid. Any ideas? Is there anything like a flaring drywall anchor kind of thing that would make a mechanical connection to a bolt through the floor?
casper5280
Crew Member
Threaded Rivet
30pcs M8 Rivet Nuts Stainless Steel Threaded Rivet Insert Nuts Rivnuts Nutsert M8-1.25mm: Amazon.ca: Tools & Home Improvement
30pcs M8 Rivet Nuts Stainless Steel Threaded Rivet Insert Nuts Rivnuts Nutsert M8-1.25mm: Amazon.ca: Tools & Home Improvement
www.amazon.ca
Corey_lax
Crew Member
An aluminum nut and bolt? Aluminum fasteners aren’t that strong.Can you weld a nut on the topside?
a stainless steel riv nut would be there way to go
CIVANO
Well-Known Member
Cool, thanks guys. Didn't know something like rivet nuts exist. That's the strong side of this forum!
See if I can find someone with the rivet gun for these. Cheers!
wishiniwasfishin1
Well-Known Member
We have one in our metal fab shop in Vancouver - Olympic Village area. Might lend it to ya if you promise to return it.Cool, thanks guys. Didn't know something like rivet nuts exist. That's the strong side of this forum!
See if I can find someone with the rivet gun for these. Cheers!
Buckethead905
Well-Known Member
I was tired of building my elaborate PVC tarp structure to cover the boat for winter. It didn’t help that the tarp I was using was 30’x40’ and needed all sorts of duct tape and special clamps to get it to fit half decently. The other issue was my sleepless nights when the wind picked up, wondering if it was all going to end up on the neighbours roof. All that in addition to a solid 8 hours to get it properly secured, I finally decided to get a custom storage cover made. I looked at a few ideas online and found a few covers that utilized the existing stainless “sea track” or “C track”. Don’t quote me on the exact name or spelling but it’s track of stainless underneath the hardtop that’s in the shape of a “C”. The existing eisenglass panels have sort of a rope sewn to the top of the panel, which slides into the track and then the bottom of the panel uses snaps on the boat to secure the panel, it works great. The benefits of using the Sea Track is that the cover doesn’t have to go over all of the items on the hardtop such as radar, rocket launchers, antennas, anchor lights ect.. this is especially nice if you want to do additions down the road and saves you from having to disconnect things like the antenna come storage time. Another positive is that heavy snow loads will not affect the cover in any way at all as the weight will be directly on the hardtop. He also added some nice options like windows in the side panels to allow light in, mesh vents in the front to allow air circulation, and a nice entry zipper for easy access into the boat. He ran out of the black awning cord so not every tiedown is secured yet, but you get the idea. 


Totally unexpected
Well-Known Member
Who made that cover for you? Pricey?I was tired of building my elaborate PVC tarp structure to cover the boat for winter. It didn’t help that the tarp I was using was 30’x40’ and needed all sorts of duct tape and special clamps to get it to fit half decently. The other issue was my sleepless nights when the wind picked up, wondering if it was all going to end up on the neighbours roof. All that in addition to a solid 8 hours to get it properly secured, I finally decided to get a custom storage cover made. I looked at a few ideas online and found a few covers that utilized the existing stainless “sea track” or “C track”. Don’t quote me on the exact name or spelling but it’s track of stainless underneath the hardtop that’s in the shape of a “C”. The existing eisenglass panels have sort of a rope sewn to the top of the panel, which slides into the track and then the bottom of the panel uses snaps on the boat to secure the panel, it works great. The benefits of using the Sea Track is that the cover doesn’t have to go over all of the items on the hardtop such as radar, rocket launchers, antennas, anchor lights ect.. this is especially nice if you want to do additions down the road and saves you from having to disconnect things like the antenna come storage time. Another positive is that heavy snow loads will not affect the cover in any way at all as the weight will be directly on the hardtop. He also added some nice options like windows in the side panels to allow light in, mesh vents in the front to allow air circulation, and a nice entry zipper for easy access into the boat. He ran out of the black awning cord so not every tiedown is secured yet, but you get the idea. View attachment 59579View attachment 59580View attachment 59581View attachment 59582View attachment 59583
Totally unexpected
Well-Known Member
I had a beautiful all season adco rv cover that worked awesome till some assclown cut it from stem to stern to steal 2 dock ropes that were left in the cockpit
Totally unexpected
Well-Known Member

trophywife
Crew Member
inserts with a butterfly. someone mentioned toggle bolt. drill a hole, push it through and the flanges pop out , giving it a good backing. i have used them for hanging handles and fixtures in showers and tiled areas. some manufactures make them pretty beefy.A question to all you experienced boat tinkerers: I have a 14' custom built aluminum drift boat that has a double floor, probably because the builder didn't want to weld seats etc onto the actual bottom and risk a weakening of the bottom structure. There is probably 2cm between the 2 floor sheets. I would like to install a foot kick board to the false bottom where my feet could push against while rowing. So it needs to be a solid connection and take lots of force and vibration. I would like to bolt through the false floor but have no access to below to attach a nut (or even less for a wrench to hold the nut). Tapping screw won't be lasting enough I am afraid. Any ideas? Is there anything like a flaring drywall anchor kind of thing that would make a mechanical connection to a bolt through the floor?
Rain City
Crew Member
If there's space Toggler brand makes a stainless one. They sinch up with a plastic zap strap first which is nice. Then just add your bolt.inserts with a butterfly. someone mentioned toggle bolt. drill a hole, push it through and the flanges pop out , giving it a good backing. i have used them for hanging handles and fixtures in showers and tiled areas. some manufactures make them pretty beefy.

SpringFever552
Well-Known Member
Cleaned top to bottom, inside and out,
Winterized till early next yr.

Winterized till early next yr.
Buckethead905
Well-Known Member
Who made that cover for you? Pricey?
A local guy here in Nanaimo, his name is Dennis. If anyone wants his contact info you can PM me, he did an outstanding job. Just a generic cover with middle of the road fabric from on an online supplier would have cost around $1500, if that’s any indication of what a custom one would cost in comparison. Definitely not cheap, but you get what you pay for and I think it’s worth it.
Similar threads
- Replies
- 11
- Views
- 1K
- Replies
- 13
- Views
- 1K
- Replies
- 16
- Views
- 2K
- Replies
- 56
- Views
- 5K