Waterproof electrical connections?

My electrical supplier does most of his business with logging trucks, has done for decades. We both figure the vibration issues are about the same with boats and log trucks. Salt corrosion occurs with trucks too, but not a year round issue as with coastal boats. His mantra is crimp, solder, heat shrink. Worked for me so far.

Sly_karma I guess that just means we're old dinosaurs. I just always been a soldering guy ever since I bought my first copy of the 12 volt doctors Bible for boats. I know the new crimping systems are far superior to the old stuff, but I still feel soldering most crimps on is only making for a better connection. With the glue and heat shrink I add to them I'm pretty confident they'll last longer than me. Or at least till the component they're attached to fails, and I wire in a new component. That's where I think this all becomes moot, these wiring systems will probably outlast anything that's wired in these days. With everthing made in China, I'm pretty sure most of my wiring will outlast what I'm wiring up. At which point I'll probably redo the wiring anyways just to be on the safe side when the shoddy component fails.
 
Lots of great advice in this thread and I hope a lot of people learn from it. Some will think it is overkill but it is the right way to go about your electrical connections on your boat. I see or check out quite a few boats every year and it blows me away how bad the electrical systems are on some of the boats.

If you are buying a used boat please refer to a lot of threads on this site about electrical systems.
If you are re-doing an existing boat please refer to a lot of threads on this site about electrical systems.
If you care you will use good marine products like Anchor, Blue Seas, etc. that are designed for marine applications.
If you really don't care about anything.....keep using the cheap wire and electrical connections from Princess Auto and Lordco.

The knowledge on this site is unreal. Thank you for all the knowledgeable folks that take the time for threads like this. The search feature is just a click away.

Cheers,
Sculpin
 
Last edited:
Sadly there is som pretty shoddy wiring that comes right from the boat manufacturing factories using inapropriat non sealed connectors. Something to watch for when buying a new boat as well.
 
Sadly there is som pretty shoddy wiring that comes right from the boat manufacturing factories using inapropriat non sealed connectors. Something to watch for when buying a new boat as well.

You got that right. I'm not saying shoddy wiring on my boat from the factory, but cheapo barest of effort into it.

Thank the Lord. I just finished my wiring job now. I thought it would never end. I wished I'd never started because once I got in there I just kept upgrading one system after another. Don't ask me why, but I even wired in a second perko battery switch for my kicker with a lock on the switch. Now the kicker can't be started if I lock it out. Man that was a lot of work inside my battery compartment. Fabricated an aluminum floor plate to hold my batteries, the old one was plywood and was sagging. New bilge pump. Too much too list. Man am I glad it's done. Nothing sparked and caught fire when I turned the switches on so I guess all is good. I did a lot of wiring, but I also simplified the wiring quite a bit aside from the extra battery switch (which I'll admit is overkill).

Now I can finally go out its a gale warning tomorrow. DOOOH
 
Great techniques BigGuy - I always like what you have to say. For vibration, be sure to have clamps/zip ties to support wiring/prevent chaffing.
I used to work for Boeing in their electrical/wiring engineering. They like crimps as it results in fewer faulty connections versus a cold solder joint. That probably translates into more skill is required for soldering versus crimping. If you use the method of soldering a crimp, I think the joint will be well supported & be vibration resistant.
Worst thing I had to rework on my boat was where somebody had twisted the bare ends together then wrapped it with a band aid.

Tip - if soldering, be sure to paint the joint with flux before soldering. Heat the joint quickly so you don't melt the wire insulation. Sometimes I use a little torch on larger gauge wire.

Each device should have a separate ground wire that connects to a negative bus bar that is connected to the negative battery terminal. Assume that the ground wire does carry some voltage/current. This will prevent odd behaviour of electronics/instruments & prevent stray currents that can repel fish. If you choose to not do this just be sure you fish at least 100 yds away from me (-:
 
as Eric said grounds are key. i do the same on my boat trailer, no ground wires to the trailer frame they all are run forward to a junction box then to the plug
 
as Eric said grounds are key. i do the same on my boat trailer, no ground wires to the trailer frame they all are run forward to a junction box then to the plug

That's too funny, I thought I was the only one out there to mount a junction box on my trailer. My trailer has so many wires coming out of that junction box it looks a bit hilarious. Ive wired each light separately on the trailer and there's no shortage of extra lights. I even mounted a light on each side of the junction block at the front of the trailer. Every light independently wired on the trailer leads to a birds nest of wires, but the wiring is really reliable. I thought I was the only one that anal about my wiring.
 
Great techniques BigGuy - I always like what you have to say. For vibration, be sure to have clamps/zip ties to support wiring/prevent chaffing.
I used to work for Boeing in their electrical/wiring engineering. They like crimps as it results in fewer faulty connections versus a cold solder joint. That probably translates into more skill is required for soldering versus crimping. If you use the method of soldering a crimp, I think the joint will be well supported & be vibration resistant.
Worst thing I had to rework on my boat was where somebody had twisted the bare ends together then wrapped it with a band aid.

Tip - if soldering, be sure to paint the joint with flux before soldering. Heat the joint quickly so you don't melt the wire insulation. Sometimes I use a little torch on larger gauge wire.

Each device should have a separate ground wire that connects to a negative bus bar that is connected to the negative battery terminal. Assume that the ground wire does carry some voltage/current. This will prevent odd behaviour of electronics/instruments & prevent stray currents that can repel fish. If you choose to not do this just be sure you fish at least 100 yds away from me (-:

All good tips Eric. And yes I did everything you suggested and more new plastic loom covering each wire even though it is already marine grade wire with an extra insulation layer on it anyways.

I found some neat new type of wire Mounts for places I couldn't drill out to mount supports. They are plastic and stick on with a hole going through 2 ways to zap strap your wires up. They probably won't stay stuck on too long, but they are in a location that they are easily replaced. I couldn't drill to mount there, so I thought I'd try them. Never used that type of Mount before. Very handy, but as I say I don't know how long the adhesive will last.

That's is unreal about the band aid for the connector. I'm sure the insurance company would love to find our about that in the case of a fire. That ranks up up there with the all time worst wiring jobs ever award.
 
The thing about shoddy work is that it works just as good as great work - for a while. My boat is a 1978 & in great shape. All the work I do is so my grand kid's can safely use this boat.
My goal is to label very wire & create documents about the electrical systems. I was a computer system architect at Boeing & created computer systems for the design & documentation of the avionics/electronics/electrical systems on their aircraft.

FYI, a 747 had over 4000 miles of wiring.
 
Good work Eric. I haven't gotten as far as the whole boat wiring diagram yet. I made the wiring diagram of all the wiring at the Stern of the boat where I was working, and tagged every wire at the back end of the boat. Unfortunately, the factory wiring did not have tags or diagrams when I bought the boat as the second owner from my cousin. Every time I do some work I make sure I tag all my work, and as much of the factory wiring as I can identify when I'm in there. So I do not have a full wiring diagram of the boat yet, but I'm working my way towards that.

Oh and by the way, I sometimes go even one step further for wires that are exposed to the elements or constantly submerged. This is the ultimate protection policy. Use a marine grade butt end connector for the separate wires. Solder the but connector after crimping. Cover the joined connection liberally with aprox 5" of glue with a glue gun. Cover the smoothed out glue with a piece of heat shrink, and seal everything into one solid unit with a heat gun. Afterwards I cover the entire joined section of the wire with either marine grade silicone or silkaflex. I only go the extra step of completely covering the heat shrink tubing with marine sealant for very important connections that are regularly submerged. I do not have any locations on my current boat where I've had to do that. I've done that on other boats for extra insurance on regularly submerged connections, or ones exposed to the elements in the past.

Sorry for repeating my steps, but that was a ways back at the start of the thread and some people just read the most recent posts.
 
I guess I've joined the ranks of those who believe in a second and even third line of protection. I just re-wired my trailer, did the same thing as The Big Guy- complete home runs for each and every light, hot and ground, everything in a JB right up at the hitch so it sees minimal water. Two bilge pumps, one manually switched and one with a float switch, and on separate circuits - even fed from separate fuse blocks. Those bilge pumps have connections that would potentially be submerged, I might have to pull them and do the glue connection as described in this thread!

For those who know or suspect their boat wiring is less than stellar but are procrastinating because of the size of the job - it's perfectly possible to do the work circuit by circuit rather than losing the use of the boat for a large block of time. My re-wire took place over most of a summer, the principle was work on the boat on Saturday, go fishing on Sunday. First I assessed the boat's current and future needs, planned out the system architecture, got the components together. There's the most important piece of your re-wire right there: planning. No point in taking the boat out of the water until that's done and you have the right components. I spent half a day installing 1x2 cedar strips tucked inside the gunwales and attaching mounting blocks for cable ties. Then I put in one full weekend wiring in a second battery, the Add A Battery system, ground bus bar, the two circuit breakers and the forward fuse block. After that it was just bypassing the existing wiring and one by one connecting the various components to the new fuse block using new wire and connectors. Next came the aft fuse block and connections to downriggers and auto bilge pump. The boat didn't have much electronics before this so the plotter/sonar and VHF were added at this time, including network cabling to the existing fishfinder which was relocated aft. Once all the new wiring was in place, I stripped out and dumped all the old wire and secured everything with numerous cable clamp locations. That was two years ago and it's been flawless since. First time I've tackled a full re-wire but lots of reading and research made it straightforward. Everything done one day at a time except for the big switchover to dual batteries and circuit breakers.
 
^ nice work! That is the foundation.
 
20160114_121641.jpg 20151211_153959.jpg With all this wiring talk I thought I would throw a couple of photos of last years winter project. I added a Blue Seas ACR and decided to go with another ON/OFF switch that is isolated and dedicated to a house battery for house loads as well as my kicker. The 1/2/Both switch is isolated and dedicated for my starting battery for the main motor. With the 1/2/Both switch I can switch and combine the batteries as needed in case of an emergency/failure on either battery. The small on/off switch to the right was an option that Blue Seas suggested to add for "no current draw when in storage" I got this idea to wire the ACR this way after reading many pages of battery switch wiring on a forum from Sailboatowners.com
 
nice work daddy
 
I guess I've joined the ranks of those who believe in a second and even third line of protection. I just re-wired my trailer, did the same thing as The Big Guy- complete home runs for each and every light, hot and ground, everything in a JB right up at the hitch so it sees minimal water. Two bilge pumps, one manually switched and one with a float switch, and on separate circuits - even fed from separate fuse blocks. Those bilge pumps have connections that would potentially be submerged, I might have to pull them and do the glue connection as described in this thread!

For those who know or suspect their boat wiring is less than stellar but are procrastinating because of the size of the job - it's perfectly possible to do the work circuit by circuit rather than losing the use of the boat for a large block of time. My re-wire took place over most of a summer, the principle was work on the boat on Saturday, go fishing on Sunday. First I assessed the boat's current and future needs, planned out the system architecture, got the components together. There's the most important piece of your re-wire right there: planning. No point in taking the boat out of the water until that's done and you have the right components. I spent half a day installing 1x2 cedar strips tucked inside the gunwales and attaching mounting blocks for cable ties. Then I put in one full weekend wiring in a second battery, the Add A Battery system, ground bus bar, the two circuit breakers and the forward fuse block. After that it was just bypassing the existing wiring and one by one connecting the various components to the new fuse block using new wire and connectors. Next came the aft fuse block and connections to downriggers and auto bilge pump. The boat didn't have much electronics before this so the plotter/sonar and VHF were added at this time, including network cabling to the existing fishfinder which was relocated aft. Once all the new wiring was in place, I stripped out and dumped all the old wire and secured everything with numerous cable clamp locations. That was two years ago and it's been flawless since. First time I've tackled a full re-wire but lots of reading and research made it straightforward. Everything done one day at a time except for the big switchover to dual batteries and circuit breakers.

In your post you mention you were thinking of redoing your submerged bilge connections (as I posted using the glue and shrink wrap) .

It is not difficult to do, but I'd suggest a trial run on similar sized wires and connection before you redo an important item like your bilge pump. You don't want to have to do the connection more than once to get it right, as I'm sure you don't want to keep cutting off sections of the leads from the bilge pump.

It is a pretty easy method once you get the hang of it. But if you've never done it before it might take a bit to get the feel for how much glue to use, and what size tubing your looking to match to the amount of glue and size of wire. As I said it's pretty easy but you might want to practice on some less critical systems first. Practice makes perfect, right. Good luck, and I think you'll really like the connections that method makes once you've done it a few times.
Good call, it's a tough spot to access too. Can unmount the pumps but not a lot of wire available unless I do some fairly serious removal of other items.
 
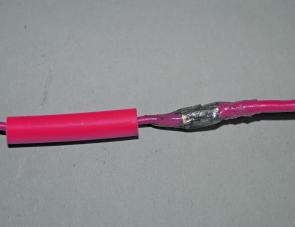
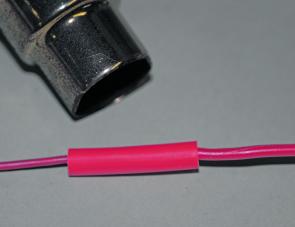
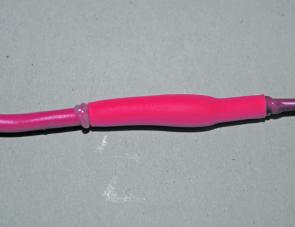
I happened upon a webpage today outlining almost exactly the same procedure I use, only he uses aluminum crimps. I thought it was worth posting.

http://fishingmonthly.com.au/Articles/Display/17770-A-waterproof-wiring-connection


This is how I seal my connections with a glue gun and heat shrink.

6e6bdc07b12144d284ad1201f750e5eb_MacdTech0115_9.jpg


6e6bdc07b12144d284ad1201f750e5eb_MacdTech0115_10.jpg


6e6bdc07b12144d284ad1201f750e5eb_MacdTech0115_11.jpg


I then smooth the excess glue around the top ends of the heat shrink and the wires
 
Last edited:
Back
Top