You are using an out of date browser. It may not display this or other websites correctly.
You should upgrade or use an alternative browser.
You should upgrade or use an alternative browser.
O.G. Scale Plug Re-Paints
- Thread starter nootkaassassin
- Start date
ChilliSpoons
Well-Known Member
Those pearls give a great shimmer
IronNoggin
Well-Known Member
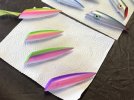
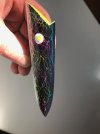
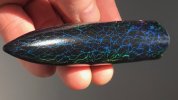
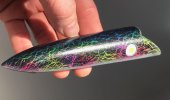
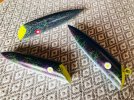
Next up I tried some color shifting paint...
Rather liking that look. Please let us know the product!!
Would like to try some of that myself...
Cheers,
Nog
nootkaassassin
Well-Known Member
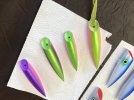
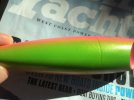
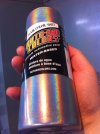
The product I used was Createx Auto-Air Flair Color- Shift Silver/Spectrum #4446 in a 4 oz bottle. Createx Wicked Colors is the same as Auto- Air line now so basically one name now no confusion between the two. Createx Wicked Colors makes a 2oz bottle under the same name #W453 The tops of the plugs where squired with Createx Wicked Colors Metallic Fastback Green #353 and it shifts from blue to green. Very cool paint too.Rather liking that look. Please let us know the product!!
Would like to try some of that myself...
Cheers,
Nog
nootkaassassin
Well-Known Member
The product I used was Createx Auto-Air Flair Color- Shift Silver/Spectrum #4446 in a 4 oz bottle. Createx Wicked Colors is the same as Auto- Air line now so basically one name now no confusion between the two. Createx Wicked Colors makes a 2oz bottle under the same name #W453 The tops of the plugs where squired with Createx Wicked Colors Metallic Fastback Green #353 and it shifts from blue to green. Very cool paint too.
IronNoggin
Well-Known Member
Many THANKS!!!
nootkaassassin
Well-Known Member
I deal with mapleairbrushsupplies.com out of Edmonton and they have a nice selection of Createx Wicked Colors
do you offer to re-paint plugs for customers?I deal with mapleairbrushsupplies.com out of Edmonton and they have a nice selection of Createx Wicked Colors
if so, what is your location?
ChilliSpoons
Well-Known Member
Great people at Maple Airbrush Supply who are always willing to answer your questionsI deal with mapleairbrushsupplies.com out of Edmonton and they have a nice selection of Createx Wicked Colors
nootkaassassin
Well-Known Member
searun
Well-Known Member
I have to say that in following this thread, you certainly are very creative. I have a ton of old tomic plugs that all need repaints in the off season. I've never tried air brushing. Getting inspired to give it a go. Any tips on how to get started, things to do and not do etc would be greatly appreciated. Just wondering how much I will need to shell out to get started...basic equipment recommendations, costs, and best paints to start with. Thanks in advance for your advice.
ChilliSpoons
Well-Known Member
First off, spend some money on your airbrush. It’s not worth trying to learn how to lay down paint when your unsure if the problem lies with your technique or the cheap butt airbrush you may have bought off of Amazon or Craigslist. I absolutely love my Iwata HP-CS but Iwata, Passche or Badger all make good airbrushes. Remember.... cheap **** ain’t good and good **** ain’t cheap.I have to say that in following this thread, you certainly are very creative. I have a ton of old tomic plugs that all need repaints in the off season. I've never tried air brushing. Getting inspired to give it a go. Any tips on how to get started, things to do and not do etc would be greatly appreciated. Just wondering how much I will need to shell out to get started...basic equipment recommendations, costs, and best paints to start with. Thanks in advance for your advice.
Createx makes a great line of paints in many different colors that are all water based. Clean up is a cinch and the fumes aren’t going to clog up your lungs like solvent paints. Maple Air Brush Supply out of Edmonton is a great place to order your paints from. Good prices and outstanding customer service. There are a few lower mainland art supply stores that sell paints but inventory can be limited.
If you already have a shop air compressor than all you’ll need is a moisture trap. Otherwise your options are to buy a dedicated airbrush compressor that only runs when spraying or a small pancake style compressor. The pancake compressor will be noisier and bulky but always comes in handy for other household projects.
YouTube is the most valuable resource when starting out and trying to decide which end of the airbrush should be pointed in the direction of your canvas. Paint reduction takes a bit of trial and error and is anything but an exact science, you’ll just need to put the time in and get a feel for it.
Last edited:
nootkaassassin
Well-Known Member
Some good advice Chilli. I use a old not so fancy Pasche vls dual action syphon feed with the 1/4 oz cup. It came with 3 different needle sizes that come in handy for some of the metallics and pearl paints. I find with my setup not sure if it’s my brush or using createx wicked but I have to thin the paint and can be a pain. Biggest learning curve was getting the right consistency in the paint and proper air pressure ( u will need a air regulator with gauge) I found having extra cups pre mixed up ahead of time and sitting for 10 min made for better consistency and less waiting around when you do a color change. Once you get your mix dialed in it’s just a matter of playing around having fun.
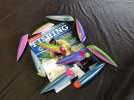
When I re-painted all these plastic plugs I scuffed them up with 400 grit wiped clean with alcohol water mix. I started off with a mixture of createx opaque white, 25% createx 4030 and reducer. After a few light coats i will then dust on a mixture of equal parts pearl white and UV additive then 25% 4030 and reducer. I use a hair dryer to heat set between coats and this is my base coat ready for color.
When I re-painted all these plastic plugs I scuffed them up with 400 grit wiped clean with alcohol water mix. I started off with a mixture of createx opaque white, 25% createx 4030 and reducer. After a few light coats i will then dust on a mixture of equal parts pearl white and UV additive then 25% 4030 and reducer. I use a hair dryer to heat set between coats and this is my base coat ready for color.
searun
Well-Known Member
Thanks for the great advice. My shop has an air compressor, so I will take your advice and get a moisture trap and a regulator set up. Sounds like the biggest thing is learning from experimentation. I have a lot of old commercial tomics that need a repaint, so plenty of practice candidates.
Similar threads
- Replies
- 17
- Views
- 931
- Replies
- 4
- Views
- 1K
- Replies
- 0
- Views
- 399
- Replies
- 19
- Views
- 1K


