20' Hourston Euro Transom

myles

Well-Known Member
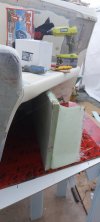
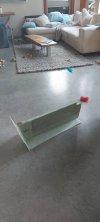
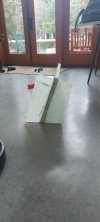
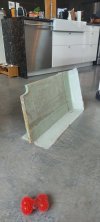
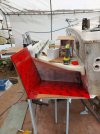
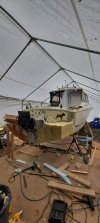
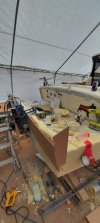
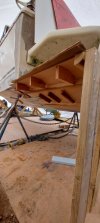
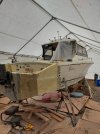
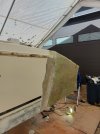
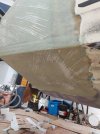
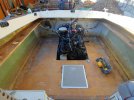
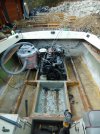
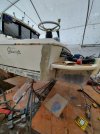
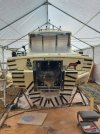
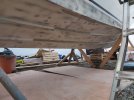
I have embarked on a project to modify my 20' hourston this winter/spring. Mainly i will be working on the existing pod which I made in 2019/2020. The pod worked fine, but there was room for improvement.

Couple of things I hope to get out of this insane amount of grinding.

1) move trim tabs further back increasing moment and needless tab to run. Using Zipwake trim tabs possibly will result in less drag and therefore better fuel economy.
2) move the kicker to starboard side of the boat to balance it better. I made a mistake having it on the Port side originally.
3) extend the swim grid full width to accommodate a cooler or bait tank.
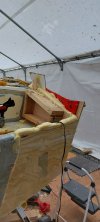
4) add more "lift" while planning to reduce the requirement for trim tabs and reduce porpoise effect.
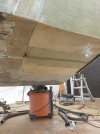
5) Tie in pod to hull and give a nice estetic look of a euro transom improving the lines of the boat.
6) Remove all blisters and interprotect hull and a finish coat of VC epoxy to reduce drag.

I will also add a new rub rail, windlass, new headliner and carpet downstairs and get a larger alumnum roofrack made with intergradted rod holders. Im thinking 8 rod holders should be enough but maybe to be safe i will do 10?

Also considering building a 20 gal live well, but would rather just buy if someone has a round or oval they want to sell or trade.

Any thoughts or comments let me know
Let the fun begin!
 
photos didn't attach to the main body so here they are below. Keep in mind i was using epoxy and it was pretty cold so some of the lay-ups are cloudy.
 

Attachments

  • IMG_20200726_123610.jpg
    IMG_20200726_123610.jpg
    134.7 KB · Views: 560
  • 20190303_154702_HDR.jpg
    20190303_154702_HDR.jpg
    331.3 KB · Views: 544
  • 20190303_165106.jpg
    20190303_165106.jpg
    265.1 KB · Views: 496
  • 20210228_165527.jpg
    20210228_165527.jpg
    206.7 KB · Views: 482
  • 20210306_130635.jpg
    20210306_130635.jpg
    268.8 KB · Views: 472
  • 20210307_172734.jpg
    20210307_172734.jpg
    285.3 KB · Views: 456
  • 20210307_174028.jpg
    20210307_174028.jpg
    138 KB · Views: 427
  • stingers.jpg
    stingers.jpg
    397.5 KB · Views: 437
  • transom-recore.jpg
    transom-recore.jpg
    344.5 KB · Views: 446
  • 20190323_111318_HDR.jpg
    20190323_111318_HDR.jpg
    350.2 KB · Views: 431
Last edited:
however in your case you just moved the CG 4-5 feet back which is a massive change on a boat of 20'. you just moved 25% of the boats weight around 25% aft without equal changes in the center of bouancy or hull plane area.
 
however in your case you just moved the CG 4-5 feet back which is a massive change on a boat of 20'. you just moved 25% of the boats weight around 25% aft without equal changes in the center of bouancy or hull plane area.
Very true the new engine is about 4 or 4.5ft further back from the old inboard GC. The engine i took out was heavier around 625# plus the leg so I have that in my favor. And with the current pod, the boat is nearly a 23ft boat already. I also added fuel tanks a bit further which help compensates the stern CG.
I think the two big take aways is with this upgrade are:

1) I will have my new trim tabs 2.5ft further back (increase their moment arm) thus reducing the required stroke for the desired effect.
2) About 150% more stern planning surface will be gained by the proposed full-width extension from how it sits now. That will provide increased stern lift to midigate the stern CG.

not a perfect situation but currently the boat runs pretty good gets 3.5 up to 4.1mpg at 28MPH so im thinking it will only get better with this upgrade. in the very least it will look good ;)

everything is be constructed with epoxy and foam so the little reno should add very little weight for the added listed benefits. i belive the pod was about 75# when I made it.

thanks for the link. i will check it out.
 
Pretty good economy already, interested to see the results. I’m getting about 3.5-4mpg/22-25knts in my 18 with a narrow planing pod and a new 150suzuki. Might be a hull extension pod with a full swim grid in the future, mainly to improve low speed planing in rougher seas and porpoising but added economy is always nice. what hp is your main?
 
Pretty good economy already, interested to see the results. I’m getting about 3.5-4mpg/22-25knts in my 18 with a narrow planing pod and a new 150suzuki. Might be a hull extension pod with a full swim grid in the future, mainly to improve low speed planing in rougher seas and porpoising but added economy is always nice. what hp is your main?
Is yours an 18 Hourston? Looks like it in the pic.

A full hull extension pod will totally help with low-speed planning and reduce the porpoising. When I switched mine from offshore bracket to full planning pod I got about a 2mph improvement for slow speed planning. I think I can go about 22/23mph now before it falls off step. When I just had the offshore bracket on it didn't like to go slower than 24mph. However, you will get more drag from the hull extension something to keep in mind. It just depends on how much less trim tab required I suppose but the increased stern lift from the pod. sort of a dark art. I know for my boat the change from bracket to planning pod was improved manors in the 20-high 30 mph range. I lost about 3 or 4 mph top end but it used to hit 55mph which was too fast anyway.

As for fuel economy, I feel like it's as simple as making sure the engine is totally dialed in with the correct height and the best possible prop 1st. (maybe yours already is) I should mention that when I've got full fuel (300L) and gear the mileage drops to 3.3/3.4mpg which is still pretty reasonable considering how much stuff I load into the boat for a 5-7day trip. I have a 2019 250 mercury V8 four-stroke with 19 pitch Enertia eco prop. likely I will have to step down to 18 or 17 pitch.
Yes, 18’ same boat as thormanby a few years back now.. when you had the Grady still. Can hold plane around 18kn we are running a 15.25x20p 4 blade suzuki water grip. Seems to be a pretty good fit, had a 16x21p at first and it was slow to get on step and fell off plane too quick top end was better..

I feel for you sanding and doing the interprotect, we did that about 4 years ago now not a fun job but the end result is awesome and peace of mind for any future osmosis issues.
oh i remember now. Is the current prop a 4 blade? They give more stern lift for sure but dont know about fuel economy. Depends on the application i suppose.

I had the hull sand blasted so that saved a lot of work. Just had to grind out the blisters that the sand blasting didnt dig out on its own. It will be worth it, but its a lame job. I'm looking forward to a slick hull with that VC epoxy coating. She is trailer kept so I don't have to worry about growth.
 
Been a slow start to the project. Managed to make a stringer this weekend. It probably wasn't required but better to be stronger than not strong enough. Should be casting the part this weekend. A few air bubbles in the layup, didn't get a chance to babysit the part as it cured. Part came in at 9lb. Roughly 32" by 15" 2 layers of 1708 w epoxy. I will tab it into the transom/swim grid. If my mold is correct my fiberglass skin will tie into the flanges I made. fingers crossed. I used cardboard as a spacer so I should get about 3/8 to 1/4 thick of glass on the hull.
 

Attachments

  • 20210315_174737.jpg
    20210315_174737.jpg
    96.5 KB · Views: 341
  • 20210315_174746.jpg
    20210315_174746.jpg
    121.5 KB · Views: 326
  • 20210316_094539.jpg
    20210316_094539.jpg
    112 KB · Views: 310
  • 20210316_094545.jpg
    20210316_094545.jpg
    106.4 KB · Views: 299
  • 20210316_094604.jpg
    20210316_094604.jpg
    113.3 KB · Views: 297
  • 20210314_142013.jpg
    20210314_142013.jpg
    246 KB · Views: 327
Been a slow start to the project. Managed to make a stringer this weekend. It probably wasn't required but better to be stronger than not strong enough. Should be casting the part this weekend. A few air bubbles in the layup, didn't get a chance to babysit the part as it cured. Part came in at 9lb. Roughly 32" by 15" 2 layers of 1708 w epoxy. I will tab it into the transom/swim grid. If my mold is correct my fiberglass skin will tie into the flanges I made. fingers crossed. I used cardboard as a spacer so I should get about 3/8 to 1/4 thick of glass on the hull.

is that a polished concrete floor looks real nice
 
Last weekend got a few more things ticked off the list. I will start to longboard the foam and begin the shaping process over the next few days. It was very difficult to get both sides the same this boat has a lot of curves going on. They are going to be close but not perfect! I also had a mistake on my mold relief size so I will have to build up the gap with more fiberglass so it will be about 7/16" thick when done. I will have to use polyester for this process to save $ then finish with 3 layers of 1708. Also ran out of foam-good thing this isn't my day job!. :(
 

Attachments

  • 20210321_115534.jpg
    20210321_115534.jpg
    138.6 KB · Views: 367
  • 20210321_160412.jpg
    20210321_160412.jpg
    119.8 KB · Views: 353
  • 20210321_171507.jpg
    20210321_171507.jpg
    127.2 KB · Views: 329
  • 20210321_133726.jpg
    20210321_133726.jpg
    134.2 KB · Views: 319
  • 20210320_122706.jpg
    20210320_122706.jpg
    134.8 KB · Views: 301
  • 20210321_114810.jpg
    20210321_114810.jpg
    125.1 KB · Views: 375
I was away for 7 days so not much done on the boat. Managed to get all the foam poured this weekend, and got some fiberglass to bulk up the body of the planing surface. I cored out the foam where the trim tabs are mounting and put in about 30 layers of mat and resin to have a solid chunk of fiberglass to bolt tabs to and reduce the change of water getting to the foam. Lots of different ways I could have done that part but this seemed the lowest stress way to accomplish the goal. you can see the stringer flange lined up nicely with the edge of the foam on the bottom of hull.
 

Attachments

  • 20210402_154353.jpg
    20210402_154353.jpg
    243.9 KB · Views: 359
  • 20210406_120203.jpg
    20210406_120203.jpg
    190.6 KB · Views: 325
  • 20210406_120213.jpg
    20210406_120213.jpg
    208.4 KB · Views: 290
  • 20210406_120231.jpg
    20210406_120231.jpg
    137.3 KB · Views: 284
  • 20210406_120239.jpg
    20210406_120239.jpg
    241.9 KB · Views: 365
Weekend update.

Got both sides glassed with 3 layers of 1708/medium cure epoxy. Before i started I tested my vac pump. It seemed to work fine. After getting the port side layed up and bagged I could not get the part past 2-3" hg of the vac pump. By then it was 11pm and i gave up. I think I had a leak where the tube attaches to the bag in the fitting. Nevertheless, i thought i rolled the glass well and removed 90% of the air lets and decided to see how this turns out. The next day i was a little disappointed that i had a lot of fo air bubbles. I think it's mostly in the last layer so a quick grind and some small "bandaids" and she will be better. Upon closer inspection, my vacuum system was half clogged with resin and the ring that seals it was not doing a great job. Darn totally avoidable.

Gave it another shot on Sunday did a better laminate schedule and the layup went smoother. fixed the hardware and after finding all the leaks in the bag got to part down to 15"hg by 1030pm (started the process at 11am). Cold temps slowed the cure, even with heater. In hindsight i should have turned the pressure down to 7-10" hg so less resin would be sucked into the breather cloth but that is fixable and it looks a lot worse than it is. A little resin starved but, i can just add a small amount of resin if any of that glass is left after grinding.

Added solid epoxy/glass drain holes on each side. it's the little things that matter.

Still debating if I should bring the lifting strake all the way back. would be time-consuming to make and I'm thinking it not worth the effort?
 

Attachments

  • 20210412_162459.jpg
    20210412_162459.jpg
    238.7 KB · Views: 313
  • 20210412_163645.jpg
    20210412_163645.jpg
    141 KB · Views: 324
  • 20210412_165931.jpg
    20210412_165931.jpg
    240.8 KB · Views: 283
  • 20210412_170004.jpg
    20210412_170004.jpg
    214.8 KB · Views: 259
  • 20210412_170137.jpg
    20210412_170137.jpg
    219.8 KB · Views: 224
  • 20210410_163313.jpg
    20210410_163313.jpg
    224.1 KB · Views: 303
Back
Top