1977 Double Eagle 206 Build

BarkleySounder

Well-Known Member
Hello,

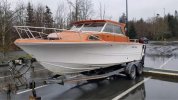
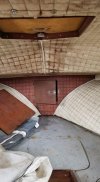
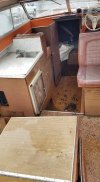
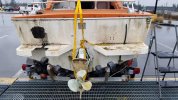
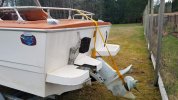
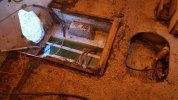
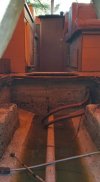
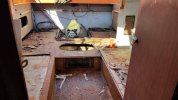
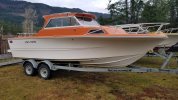
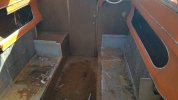
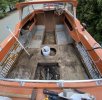
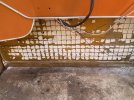
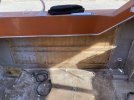
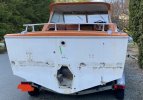
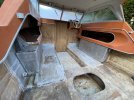
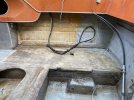
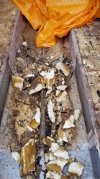
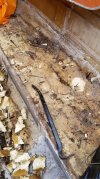
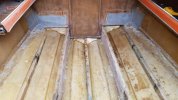
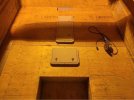
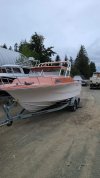
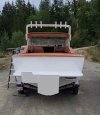
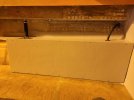
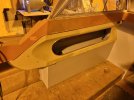
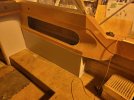
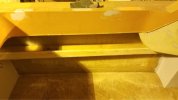
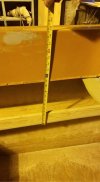
I recently acquired a 1977 Double Eagle 206 and am in the process of overhauling it. I'll do my best to update the thread as I go.

Boat upon purchase:
 

Attachments

  • 912F7884-D67D-4693-ADC1-C0D726D24EC6.jpeg
    912F7884-D67D-4693-ADC1-C0D726D24EC6.jpeg
    223 KB · Views: 322
  • BD80F03E-4CBD-460A-9222-97DD3FB39BA0.jpeg
    BD80F03E-4CBD-460A-9222-97DD3FB39BA0.jpeg
    91.7 KB · Views: 315
  • 138E9367-4685-4BBA-A071-52DA87C85257.jpeg
    138E9367-4685-4BBA-A071-52DA87C85257.jpeg
    111 KB · Views: 297
  • 9D15B31E-6C47-4ABF-977D-6F4B2E1064F3.jpeg
    9D15B31E-6C47-4ABF-977D-6F4B2E1064F3.jpeg
    145.6 KB · Views: 323
Boat after wash and initial teardown:
 

Attachments

  • 1F72C008-FDC1-430D-BC25-F800CFF8F4CB.jpeg
    1F72C008-FDC1-430D-BC25-F800CFF8F4CB.jpeg
    106.8 KB · Views: 267
  • 6811B019-49EB-4E5E-BCF9-9C8778305D16.jpeg
    6811B019-49EB-4E5E-BCF9-9C8778305D16.jpeg
    148.9 KB · Views: 246
  • EA309AF6-C7C5-469A-AE2D-66296BF3A2BC.jpeg
    EA309AF6-C7C5-469A-AE2D-66296BF3A2BC.jpeg
    76.8 KB · Views: 236
  • 618D5DE0-D25D-42A9-B1C6-82E05918B1B5.jpeg
    618D5DE0-D25D-42A9-B1C6-82E05918B1B5.jpeg
    102.4 KB · Views: 236
  • E642B2B0-5000-4102-9ECD-D2B30AC4D528.jpeg
    E642B2B0-5000-4102-9ECD-D2B30AC4D528.jpeg
    386.7 KB · Views: 229
  • B92D7765-1738-4D5A-83D5-EF79EBE172A3.jpeg
    B92D7765-1738-4D5A-83D5-EF79EBE172A3.jpeg
    77.4 KB · Views: 281
Continued teardown. The white tiles were a pain to get off but a nylon brush attached to a drill did the trick nicely.
 

Attachments

  • 7C589A15-0E55-4A2A-BBC8-FDCA9BC4AB24.jpeg
    7C589A15-0E55-4A2A-BBC8-FDCA9BC4AB24.jpeg
    349.2 KB · Views: 314
  • D1A4522C-EC52-46F2-95A6-F2843A805586.jpeg
    D1A4522C-EC52-46F2-95A6-F2843A805586.jpeg
    541.9 KB · Views: 289
  • 75CB3BE4-AC6E-4322-A599-D8CB778E8626.jpeg
    75CB3BE4-AC6E-4322-A599-D8CB778E8626.jpeg
    447.6 KB · Views: 262
  • CAEE32ED-2627-4271-978F-C36A1C25446C.jpeg
    CAEE32ED-2627-4271-978F-C36A1C25446C.jpeg
    412.9 KB · Views: 255
  • AF8DE054-CB4C-4FA6-A71B-E763BDEED95A.jpeg
    AF8DE054-CB4C-4FA6-A71B-E763BDEED95A.jpeg
    401 KB · Views: 255
  • BA32E493-A140-46CC-B784-09A8553108CA.jpeg
    BA32E493-A140-46CC-B784-09A8553108CA.jpeg
    512.9 KB · Views: 254
  • EC9F556E-1FE6-4D73-B193-1821BCED1608.png
    EC9F556E-1FE6-4D73-B193-1821BCED1608.png
    1.2 MB · Views: 320
All caught up. The floor has been pulled and next to come out is the foam.

Transom hole filled.

I am In search of some side cubbies, ideally the opposite configuration of mine. If you have any let me know!
 

Attachments

  • 970A4C08-4A8B-4391-AE5D-78B0FE162AE8.jpeg
    970A4C08-4A8B-4391-AE5D-78B0FE162AE8.jpeg
    157.9 KB · Views: 295
  • 90265924-99B4-48EC-85EE-981EC13AC312.jpeg
    90265924-99B4-48EC-85EE-981EC13AC312.jpeg
    255.4 KB · Views: 286
  • 716D50B0-8553-43C9-B548-D7ACD67EF8AC.jpeg
    716D50B0-8553-43C9-B548-D7ACD67EF8AC.jpeg
    221.2 KB · Views: 302
All the wet foam is out! Took a lot of time to do. Next step is to test drill the stringers. They look pretty good, but there's a couple areas to check.
 

Attachments

  • 0E6C9F4C-AD6C-4F1F-BBB5-64088EA447A9.jpeg
    0E6C9F4C-AD6C-4F1F-BBB5-64088EA447A9.jpeg
    278.2 KB · Views: 330
  • 8CF96923-D273-4ED7-987F-B4323CC5CDAD.jpeg
    8CF96923-D273-4ED7-987F-B4323CC5CDAD.jpeg
    275.6 KB · Views: 303
  • 6CDCACF4-5E0C-4647-AF1A-169CE9C60ACC.jpeg
    6CDCACF4-5E0C-4647-AF1A-169CE9C60ACC.jpeg
    249.7 KB · Views: 286
  • 8A9A3990-0226-44CF-B83B-D72EE1AF23E5.jpeg
    8A9A3990-0226-44CF-B83B-D72EE1AF23E5.jpeg
    302.2 KB · Views: 287
  • 4F86AD08-303C-48E5-94F4-9356944B72D9.jpeg
    4F86AD08-303C-48E5-94F4-9356944B72D9.jpeg
    374.6 KB · Views: 333
Any arguments for leaving the foam out or for putting it back in?

I have been playing with the idea of leaving it out to all complete water pass through in the event any ever got in. Of course a drainage point would be incorporated into the stringers.
 
91B67BBA-44F9-40AA-AC94-1DC680F75979.jpeg

Not much to update! The outer stringers have been built up to match the inner ones making the floor level. All the stringers have now been tied in to the transom and a 3/4 plywood reinforcement was added and glassed. Boat is currently being measured up for a pod and radar tower, and then back to finish up the floors!
 
Further to my last update, the excess foam was trimmed up, and my new DPI Marine hatches have arrived. I chose these over tempress as they stick out/up way less making them almost flush when installed.

The floor has been cut to shape, and is just about ready for glass and gelcoat. As you will see in the photo, two reinforcement plates have been glassed between the stringers for when I mount the passenger pedestal seats.

The pod and other aluminum work is also coming along!
 

Attachments

  • F7DA13BC-D3F3-491D-94ED-2B0E7E7FFEDF.jpeg
    F7DA13BC-D3F3-491D-94ED-2B0E7E7FFEDF.jpeg
    217.8 KB · Views: 231
  • A2BC0FDF-AF4A-4762-B301-84D375779C76.jpeg
    A2BC0FDF-AF4A-4762-B301-84D375779C76.jpeg
    562.7 KB · Views: 225
In the past weeks the floor has now been glassed in, and the inner workings are coming together.

The pod, radar arch, battery tray and saddle tanks have also been completed! The tanks will be installed once the floor finishes up.

I'm considering getting the retro Orange converted over to white to modernize the boat.
 

Attachments

  • 097EB031-1013-405E-9E1C-18F487BAA1C2.jpeg
    097EB031-1013-405E-9E1C-18F487BAA1C2.jpeg
    100.4 KB · Views: 334
  • A1474F24-8E32-47F4-ACDE-A11AF6C47D97.jpeg
    A1474F24-8E32-47F4-ACDE-A11AF6C47D97.jpeg
    101.9 KB · Views: 311
  • 20C51B58-2630-4C4D-81D2-FBB148C61470.jpeg
    20C51B58-2630-4C4D-81D2-FBB148C61470.jpeg
    74.3 KB · Views: 294
  • ECD904C1-69F3-4C89-B8AA-56292B5DCE26.jpeg
    ECD904C1-69F3-4C89-B8AA-56292B5DCE26.jpeg
    88.8 KB · Views: 304
  • 50C90670-3742-4CEB-8C66-7A590178B0FC.jpeg
    50C90670-3742-4CEB-8C66-7A590178B0FC.jpeg
    81.2 KB · Views: 336
In the past weeks the floor has now been glassed in, and the inner workings are coming together.

The pod, radar arch, battery tray and saddle tanks have also been completed! The tanks will be installed once the floor finishes up.

I'm considering getting the retro Orange converted over to white to modernize the boat.
careful your gonna make @DanJ jealous that hes behind! lol
 
Over the past week the two saddle tanks have been fitted and glassed in. I had them fabricated about 8" longer then original for the added fuel capacity. I was able to track down the elusive side cubby that matched the starboard side as the port side had a kitchenette and only half a cubby.

Lots more to come but making headway!
 

Attachments

  • 7BC156DE-3EA9-4F71-918C-921B58CCDE14.jpeg
    7BC156DE-3EA9-4F71-918C-921B58CCDE14.jpeg
    584.5 KB · Views: 319
  • 36819223-E1AE-4624-81D7-342A2E8A1DC4.jpeg
    36819223-E1AE-4624-81D7-342A2E8A1DC4.jpeg
    91.5 KB · Views: 309
  • 7DF7AFC6-D9B5-4BA5-ADE1-F09FEDDEB43C.jpeg
    7DF7AFC6-D9B5-4BA5-ADE1-F09FEDDEB43C.jpeg
    43.6 KB · Views: 292
  • DBA7A430-3574-4FB0-9716-287357E7D125.jpeg
    DBA7A430-3574-4FB0-9716-287357E7D125.jpeg
    541.5 KB · Views: 289
  • 50945F16-36A1-44F5-8B4B-4332A7F61CE0.jpeg
    50945F16-36A1-44F5-8B4B-4332A7F61CE0.jpeg
    551.1 KB · Views: 282
  • B51C10F6-8C3C-47D0-A316-F9DA2FCB7B65.jpeg
    B51C10F6-8C3C-47D0-A316-F9DA2FCB7B65.jpeg
    53.5 KB · Views: 324
For my boat, it was $500. This includes me paying for his gas as he came from Campbell River to do the application. All in all pretty reasonable! I assume each project is different as it depends on boat size and amount of foam needed. I called him beforehand for a quote and it was pretty accurate.
 
For my boat, it was $500. This includes me paying for his gas as he came from Campbell River to do the application. All in all pretty reasonable! I assume each project is different as it depends on boat size and amount of foam needed. I called him beforehand for a quote and it was pretty accurate.
Not bad at all, thx
 
Its a little late but may i suggest adding some more breather hose to the tanks to allow more raise in height up from the breather. I have the same boat and i cut mine shorter and it allowed alot of water in my tank in rough water.
 
Its a little late but may i suggest adding some more breather hose to the tanks to allow more raise in height up from the breather. I have the same boat and i cut mine shorter and it allowed alot of water in my tank in rough water.
Good to know. I'll have to likely adjust this!
 
Painting has begun, and the roof is complete. Lighting isn't the greatest but I can update later!

Some side storage cubby's on the aft gunnels have been mocked up. They will be glassed and tied in and gel coated when the boat is at that stage! I wanted this as It will add storage and strength to the hull.

The remaining orange will be painted once the remaining holes are glassed up. May be done by the end of the week.
 

Attachments

  • 33F97B41-B85A-44CF-A855-5F5F9632AB9B.jpeg
    33F97B41-B85A-44CF-A855-5F5F9632AB9B.jpeg
    179.7 KB · Views: 238
  • 698A1DC0-D590-4284-B07E-44DD6007AB13.jpeg
    698A1DC0-D590-4284-B07E-44DD6007AB13.jpeg
    122.3 KB · Views: 236
  • 8ED8A8D0-1553-4532-9A72-385B6BFA9CA2.jpeg
    8ED8A8D0-1553-4532-9A72-385B6BFA9CA2.jpeg
    98.4 KB · Views: 239
Back
Top