
You are using an out of date browser. It may not display this or other websites correctly.
You should upgrade or use an alternative browser.
You should upgrade or use an alternative browser.
Plug Re-Paints UV Edition
- Thread starter nootkaassassin
- Start date
nootkaassassin
Well-Known Member
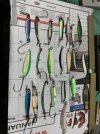
Not a very common plug.But definitely a cool old style plug, probably in my top 3 Vancouver Island plugs. Not sure when they where produced, maybe late 40’s right here on Vancouver Island. They might have been partners with Rex- Field or maybe they just painted the plugs. Where the back end is notched out there is a swivel tucked in the back. They drilled a small hole and added a piece of brass up through the belly to the back to hold the swivel secure to attach the hook. The front lip is done the same way.I painted over the brass keepers on the belly so you don’t see them.


nootkaassassin
Well-Known Member
Found this interesting article in the 2020 Island Fisherman’s magazine.


kingblazer84
Well-Known Member
betty white fishinator slays in OK lake for rainbows.Found this interesting article in the 2020 Island Fisherman’s magazine.
View attachment 73106View attachment 73107View attachment 73108
nootkaassassin
Well-Known Member
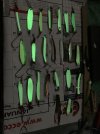
Here is the start of the journey to the UV plug (AKA BANDIT) that I had great success with last year. I started off with a base coat of #4424 Hi-lite blue mixed with equal parts UV additive. The HI-Lite blue is cool , I have used it before for scales and gives off a nice blue hue under light and shifts to off white under low light. Hard to see on a round plug but on a flat surface it is really noticeable.
Here is a example of the HI - lite paint. This Pic was from a spilled paint cup with #4424 I had used my finger and smeared it around so it was pretty thick. The plug above was sprayed over purple with the #4424 as scales.

So once the base coat of #4424 and additive was sprayed it was time to squirt the back of the plug


Hopefully you can see the blue hue down the plug where the sun light was hitting it.
Here is a example of the HI - lite paint. This Pic was from a spilled paint cup with #4424 I had used my finger and smeared it around so it was pretty thick. The plug above was sprayed over purple with the #4424 as scales.
So once the base coat of #4424 and additive was sprayed it was time to squirt the back of the plug
Hopefully you can see the blue hue down the plug where the sun light was hitting it.
nootkaassassin
Well-Known Member
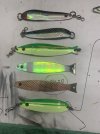
I ended up spraying a couple coats of silver down the back first and down 2 the shoulders. Then I squirted the Pearl Teal over the Silver. The metallic silver gives the pearl a little kick. I used iridescent purple for the face and under blue light the purple looks silver.


I had such great success with this plug that I had 2 paint a few more…. Plugs on the right side have candy sprayed over the top of the Teal that’s why they look different.
They sure give off a nice blue hue under the blue light.


I had such great success with this plug that I had 2 paint a few more…. Plugs on the right side have candy sprayed over the top of the Teal that’s why they look different.
They sure give off a nice blue hue under the blue light.
ChilliSpoons
Well-Known Member
Those are looking deadly. Great to see your painting skills evolving nicelyI ended up spraying a couple coats of silver down the back first and down 2 the shoulders. Then I squirted the Pearl Teal over the Silver. The metallic silver gives the pearl a little kick. I used iridescent purple for the face and under blue light the purple looks silver.
View attachment 73119View attachment 73120View attachment 73121
I had such great success with this plug that I had 2 paint a few more…. Plugs on the right side have candy sprayed over the top of the Teal that’s why they look different.
They sure give off a nice blue hue under the blue light.
View attachment 73124View attachment 73125
nootkaassassin
Well-Known Member
Thanks Chilli hopefully 1 will fool a fishThose are looking deadly. Great to see your painting skills evolving nicely
Both of you are awesome Painters... Lets be realistic.. If it was just about fooling fish we would only own a couple pearl white plugs.... This is all about Bling for Us !!Thanks Chilli hopefully 1 will fool a fish
CR Greg
nootkaassassin
Well-Known Member
Thanks Greg, I wish you would have told me years ago would have saved a few nickels. Maybe we can slip 1 of your pearl white plugs into Dave H stocking this year so he can fool a few fish next season…Both of you are awesome Painters... Lets be realistic.. If it was just about fooling fish we would only own a couple pearl white plugs.... This is all about Bling for Us !!
CR Greg
Not to be high jacking your thread but I also have been trying to keep busy in these ****** times, making some winter time lures.
Concentrating on the glow aspect, didn't think about the UV I will get back to the shop and make up some more with UV paint
Can't wait to try to see what works the best.
Concentrating on the glow aspect, didn't think about the UV I will get back to the shop and make up some more with UV paint
Can't wait to try to see what works the best.
Attachments
nootkaassassin
Well-Known Member
Hey Wireman,glad you chimed in and shared your nice work . Hopefully you and I will continue 2 inspire others to do the same
Cheers NA
Cheers NA
nootkaassassin
Well-Known Member
I purchase my paint from mapleairbrushsupplies.comwhere are you guys purchasing you paint?, have a few shovel noses i want to refinish, pearl white and maybe some glows
nootkaassassin
Well-Known Member
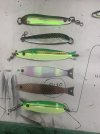
Below is a pic of the original UV Lime Ricky Plug. Never attracted a fish so it went into the re- cycle bin. The 2.0 version only needed some yellow and some metallic scale and it was game on. The 2.0 was put into action on the last 2 days of fishing season and didn’t disappoint.
Now I needed to replicate a couple more….

The 3.0 plugs belly was sprayed with Hot Rod Sparkle white with UV additive. Hot Rod sparkle is the biggest flake that createx makes and I shot it through my air brush with a .7mm tip with no problems. Then squirted equal parts fluorescent yellow and wicked yellow. I have found that this mix sprays nice and no chalky look and will not fade out as bad as straight fluorescent paint.


Time to spray the back with equal parts of fluorescent green and sparklescent green.

After the paint dried i added metallic scales and then squirted on some candy poison green. Plug at the top is the 2.0 version and is made of wood and was clear coated with just the regular createx clear and shows no major issues with the paint.

Under the light I was shocked 2 notice that the Candy did not allow the fluorescent green to penetrate through so they are left with black backs. I still think they turned out okay.

Now I needed to replicate a couple more….
The 3.0 plugs belly was sprayed with Hot Rod Sparkle white with UV additive. Hot Rod sparkle is the biggest flake that createx makes and I shot it through my air brush with a .7mm tip with no problems. Then squirted equal parts fluorescent yellow and wicked yellow. I have found that this mix sprays nice and no chalky look and will not fade out as bad as straight fluorescent paint.
Time to spray the back with equal parts of fluorescent green and sparklescent green.
After the paint dried i added metallic scales and then squirted on some candy poison green. Plug at the top is the 2.0 version and is made of wood and was clear coated with just the regular createx clear and shows no major issues with the paint.
Under the light I was shocked 2 notice that the Candy did not allow the fluorescent green to penetrate through so they are left with black backs. I still think they turned out okay.
ChilliSpoons
Well-Known Member
BadAssBelow is a pic of the original UV Lime Ricky Plug. Never attracted a fish so it went into the re- cycle bin. The 2.0 version only needed some yellow and some metallic scale and it was game on. The 2.0 was put into action on the last 2 days of fishing season and didn’t disappoint.
Now I needed to replicate a couple more….
View attachment 73247
The 3.0 plugs belly was sprayed with Hot Rod Sparkle white with UV additive. Hot Rod sparkle is the biggest flake that createx makes and I shot it through my air brush with a .7mm tip with no problems. Then squirted equal parts fluorescent yellow and wicked yellow. I have found that this mix sprays nice and no chalky look and will not fade out as bad as straight fluorescent paint.
View attachment 73248View attachment 73249View attachment 73250
Time to spray the back with equal parts of fluorescent green and sparklescent green.
View attachment 73253
After the paint dried i added metallic scales and then squirted on some candy poison green. Plug at the top is the 2.0 version and is made of wood and was clear coated with just the regular createx clear and shows no major issues with the paint.
View attachment 73254
Under the light I was shocked 2 notice that the Candy did not allow the fluorescent green to penetrate through so they are left with black backs. I still think they turned out okay.
View attachment 73255
nootkaassassin
Well-Known Member
Well I was back (black) at it a couple months ago... apparently with this wicked chrome paint you need a glossy black coat too start with.


After dusting on several very lightly coats it was very obvious that I didn’t do a very good job on prepping the plugs as the chrome highlighted all the scratches,blemishes and of course teeth marks ha. Tomic plug body’s are about 1/8 inch thick so you can be a little aggressive with sanding if you like.
I found the chrome paint very easy too spray directly from the bottle with no reduction and probably only used 1/4 oz


First plug I squirted was candy tequila yellow and WOW the color over chrome looks like gold plate. I was not expecting that I was going for a sardine color pattern with yellow not gold.
After dusting on several very lightly coats it was very obvious that I didn’t do a very good job on prepping the plugs as the chrome highlighted all the scratches,blemishes and of course teeth marks ha. Tomic plug body’s are about 1/8 inch thick so you can be a little aggressive with sanding if you like.
I found the chrome paint very easy too spray directly from the bottle with no reduction and probably only used 1/4 oz
First plug I squirted was candy tequila yellow and WOW the color over chrome looks like gold plate. I was not expecting that I was going for a sardine color pattern with yellow not gold.
Similar threads
- Replies
- 2
- Views
- 1K
- Replies
- 3
- Views
- 915