Why I'm not on the water yet!

Well I made a good call on pulling the fuel tank. Yep there was water in that chamber probably about 15 gallons of it!!!!!

IMG_1238.jpg


IMG_1236.jpg


IMG_1239.jpg


IMG_1241.jpg


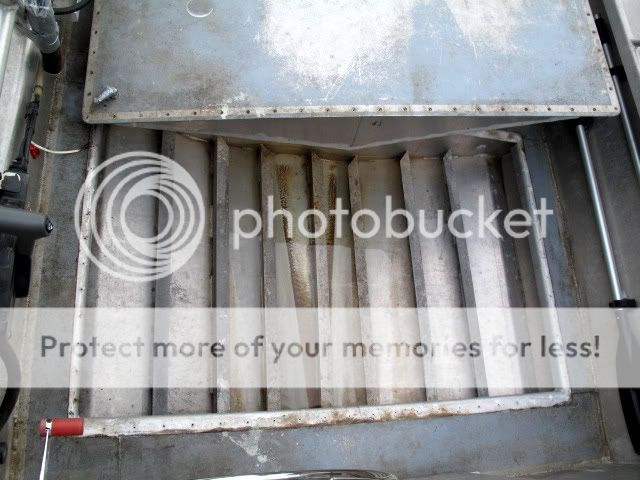
The good news is there was no smell of gas in there so the tank is sound. Ed did used Tef-gel or something similar as the bolts came out pretty good. It appears that the tank is just "hung" by the top flange as it appears to not touch any of the angles below. I don't know if this is a good thing or not.

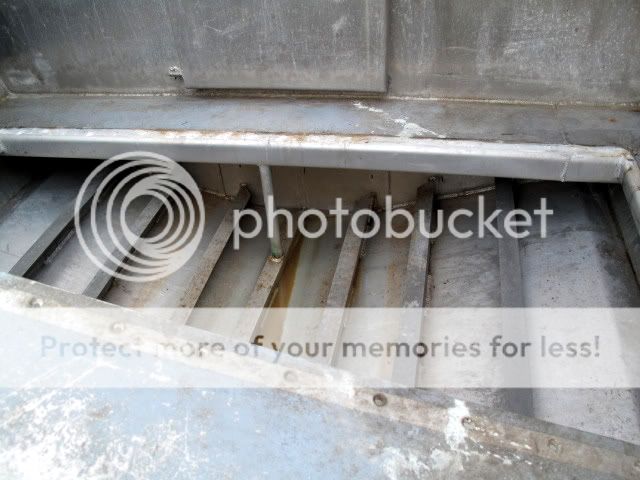
I pumped out all the water and hand chased all the holes to clean them out. I will use Tef-gel on all the bolts again. I bought new bolts with a hex style head instead of the stupid philips head ones that were in there.

Ed used clear silicone to seal it before but it obviously leaked. I'm going to clean up all the contact points on the deck and the flange of the tank and put something different down. I was thinking Sikaflex or 3M. Anyone have suggestions?
 
Butyl tape maybe, sticks like mad and repels water, its about 1/2 inch wide and maybe 1/8 inch thick,
you can pick it up at any automotive glass shop and stick it to either boat side or tank flange and drop her back in place, remains flexible, wont crack with temp changes and lasts forever, they put windshields in with it.
screw it down and you should have a very dry compartment area,
just a thought
Tim

I'll look into that for sure Tim thanks for the suggestion.
 
Actually re-thinking it they also have a urethane tape (grey color) use that instead works just as well
maybe a little better but way easier to work with and blends in a little better against the aluminum color
and easier to get off at a later date if needed,
you could always toss a bilge pump in there towards the back to remove and future worries,
or what is just behind that fuel compartment is there a bilge area?, could you drill a couple holes in that devider to allow water to drain to the rear if indeed that last area has a bilge in it already?? sorry just thinking out loud again
Tim
 
Last edited by a moderator:
Actually re-thinking it they also have a urethane tape (grey color) use that instead works just as well
maybe a little better but way easier to work with and blends in a little better against the aluminum color
and easier to get off at a later date if needed,
you could always toss a bilge pump in there towards the back to remove and future worries
Tim

I thought about the pump thing in there but if I do it right this time I shouldn't need one. Plus if the tank takes up most of the space and is half or more empty, it works as floatation as well as the area around it.
 
looking back at your first pictures, I see it was a battery compartment and looks like a bilge pump just rear and left off the batteries,
I think I'd put some drain holes in that compartment wall.........Maybe?
 
looking back at your first pictures, I see it was a battery compartment and looks like a bilge pump just rear and left off the batteries,
I think I'd put some drain holes in that compartment wall.........Maybe?


The two are separated and that is the whole design thing with the chambers. No foam in the boat. The boat has 4 chambers total for floatation. I would like to get this one nailed with proper sealing and be done with it.

I understand what your saying but I don't want to rely on an electrical pump that could malfunction etc. for keeping me a float.

Good points and thanks for the comments.
 
it doesnt appear to be one continuous weld along the bottom of that divider anyway,
by rights water should be able to seep back to the bilge area should'nt it?
however you do it, it looks like you do real nice work, I'm sure it will work out for the best anyway
 
it doesnt appear to be one continuous weld along the bottom of that divider anyway,
by rights water should be able to seep back to the bilge area should'nt it?

It is solidly welded on the other side of the divider.
 
hey just wondering why you put a bend in the brace for the swim grid instead of using just a straight brace?, btw everything looks great and very nice work, looks like i know who i'll be tracking down if i ever need some aluma welding or any other welding and fabrication,lol,;):cool:.....holmes*

I just copied some photos I saw of other boats but mainly I wanted something that would act like a step in an MOB situation. I'm going to build a folding ladder that lays on top of the swim platform.

I know the way it is now is not as strong as going straight up but everything is a compromise on a boat!

Cheers
John
 
I just copied some photos I saw of other boats but mainly I wanted something that would act like a step in an MOB situation. I'm going to build a folding ladder that lays on top of the swim platform.


Cheers
John

Awesome Idea, a reboarding device is one of the saftey requirements if you ever get checked
 
Well this is as good as it gets for now with the electrical. It's still 100 percent better than before. Everything is vinyl labelled for quick identification. I may tidy it up a bit more this winter but for now it will get me out there.

I went with the Blue Sea add a battery kit with charging relay. A Blue Sea dual bus bar for all the crap back there (downriggers, wash down pump, etc.). A battery charger (more for convenience). I could have gone with the Blue Sea blade style bus bar as well but opted for inline waterproof fuse holders. I don't trust this cabinet yet. I also mounted a 24/7 live bus bar for the bilge pumps, some LED lights under the rails, and the halogens mounted on the rocket launcher bar.

When I launch the boat I can turn on the LED's under the rails and see what I am doing when I get into the boat to open the cabinet (I put some in there too) to turn on the battery switch.

I went with nice basic Interstates because of the service and warranty. The No.1 battery is a high cranking amp model.

I would like to thank the Harbour Chandler for all the parts and experience dealing with this system for my boat. Incredible support and supplies in stock. It all went together very smooth. I highly recommend them.


IMG_1245.jpg


I had to cut my intake pipe for the washdown pump that used to come right up through the deck. I thought this would be a good safety device to install since the pipe has been cut down below water line now. It was a real pain threading that by hand under the deck!

IMG_1246-1.jpg
 
Last edited by a moderator:
Well I was going to wait till she was all done but couldn't.

Since it's dark out now. Here is a shot of the LED's under the rails and in the cabinet.

IMG_1253.jpg


Here is a shot with the LED's off and the Halogen's lighting up the deck. Might have to adjust them a bit but should work great for getting ready early morning or picking up traps in the evening.

IMG_1256.jpg
 
Wow!! talk about a dance floor,
thats looks really cool, you've done a great job on that boat
Tim
 
Wow!! talk about a dance floor,
thats looks really cool, you've done a great job on that boat
Tim

Yeah she's 10'3" from the cabin wall to the transom. Dance floor big time buddy:cool:.

Thanks Tim. It means alot to me as I wanted to do her up right this year even if it meant wasting half of an INCREDIBLE season:p!

I still have the last week of this month and all of August and part of September to fish.
 
Last edited by a moderator:
That lighting is awsome! Should be great to have in a number of scenarios. Turn on the LED lights, crank the tunes and would be a legit dancefloor ahah. Now that she is done go smoke some fish!
 
That's an awesome rig you have there. Great ideas and it's obvious you care about what you are doing. Love the dance floor, but where's the Satellite and Flat screen going to go?
 
Back
Top