
You are using an out of date browser. It may not display this or other websites correctly.
You should upgrade or use an alternative browser.
You should upgrade or use an alternative browser.
Diesel heater installation in a Grady white 232, (looking for mounting location options/ideas)
- Thread starter sparrow139
- Start date
sir-vivor
Well-Known Member
I have put aside almost all of the Chinese diesel heaters parts (except the heater itsself) and put out an additional $500 into high grade parts, which I know will benefit my system, after all it's for my own health and safelty and those on my boat, figure only safe as its weakest point. also with help from many web sites and forum members hope it's a solid addition to the Sir-Vivor , gonna post when it's all up and running. Thanks e everyone for help on thisFor reference it would be wise to download a PDF manual of a planar, or a espar/ or a reputable brand of heater that was designed for marine use. They have great information on how to install correctly and do’s and don’t of installation depending on application(auto or marine)
Im sure the Chinese heaters work well but the installation instructions are typically vague or non existent with poor translation. I must admit the planar instructions aren’t perfect either but they give you a decent starting point and a bit of knowledge for a marine application. Or auto installation depending on your intention.
also 90 percent of the parts that came with my heater were not intended for marine use so be careful with that. Fuel lines, brackets and clamps were not worth keeping. The only parts I used were the stainless exhaust pipe, and stainless muffler. The rest went in the bin.
sparrow139
Active Member

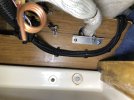
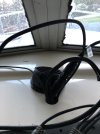
Fuel system started today.
1/4” marine rated hose to 1/8” ball valve (shut off) to 1/4 OD copper tube with compression fittings. More photos coming soon.
Sailfish25
Member
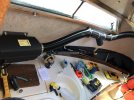
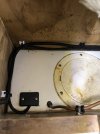
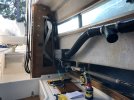
Here is my new install on a Grady 25’ Sailfish. I am 95% finished, just some tidying up to do. I underestimated how much of a pain in the butt this would be (making brackets, stand offs for the exhaust, etc) and my plans changed about 10 times along the way.
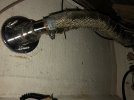
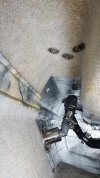
Managing the exhaust was tricky - it runs very hot, I suspect because the 24mm flexible stainless exhaust pipe is so thin. Thicker walled exhaust pipe would probably run a lot cooler. 2 layers of titanium header wrap, and one layer of high temp silicone + fiberglass insulation has tamed it. All the aluminum standoffs also have high temp silicone on them. Exhaust runs through one plywood locker, but as you can see I’ve cut out the wood and replaced with aluminum and generous amount of high temp silicone on bottom side (picture 4 below). Thru hull is 28 inches above water line. Glad this project is complete. Works great.


Managing the exhaust was tricky - it runs very hot, I suspect because the 24mm flexible stainless exhaust pipe is so thin. Thicker walled exhaust pipe would probably run a lot cooler. 2 layers of titanium header wrap, and one layer of high temp silicone + fiberglass insulation has tamed it. All the aluminum standoffs also have high temp silicone on them. Exhaust runs through one plywood locker, but as you can see I’ve cut out the wood and replaced with aluminum and generous amount of high temp silicone on bottom side (picture 4 below). Thru hull is 28 inches above water line. Glad this project is complete. Works great.
sparrow139
Active Member
Well finished this project up yesterday and I’m super happy with the results. Exhaust pipe is cool enough to grab even after running for over an hour. It puts out enough heat yo keep the cabin warm and the windshields clear.
I tried to keep the ductwork as simple as possible.

I tried to keep the ductwork as simple as possible.
Attachments
-
 0B734BBA-1538-4D42-8C31-FB81AFC835DD.jpeg343.1 KB · Views: 84
 -
 C76EB29D-F66D-4850-8EBF-0345259F577E.jpeg188.7 KB · Views: 82
 -
 3B0EFDA4-AC73-4C0F-A31D-9010A0ABAA2F.jpeg314.5 KB · Views: 82
 -
 FD087E8E-38CB-45CF-949A-D253C75BDB9A.jpeg355.2 KB · Views: 80
 -
 2DFDC19D-A74C-47DB-A755-6C24EF3F5755.jpeg184.8 KB · Views: 81
 -
 BA0F3550-3B54-4B54-9DB8-0551E5E41454.jpeg230.2 KB · Views: 84
salmonkiller01
Well-Known Member
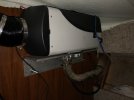
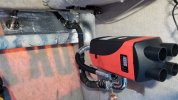
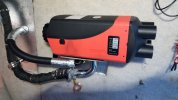
Finally installed my heater in my 20 hourston. Heater mounted in cuddy on bulk head wall
Bought Espar exhaust tube, upgraded fuel
Lines and exhaust clamps. Using a 20 litre outboard tank. Would have preferred a smaller tank. Still need to find fiel
Filter and tie things up. The height of the heater has exhaust sloping downward so no condensation issues.
Bought Espar exhaust tube, upgraded fuel
Lines and exhaust clamps. Using a 20 litre outboard tank. Would have preferred a smaller tank. Still need to find fiel
Filter and tie things up. The height of the heater has exhaust sloping downward so no condensation issues.
Attachments
Offshore
Member
Where did you get the high temp silicone + fiberglass insulation and what diameter did you use?Here is my new install on a Grady 25’ Sailfish. I am 95% finished, just some tidying up to do. I underestimated how much of a pain in the butt this would be (making brackets, stand offs for the exhaust, etc) and my plans changed about 10 times along the way.
Managing the exhaust was tricky - it runs very hot, I suspect because the 24mm flexible stainless exhaust pipe is so thin. Thicker walled exhaust pipe would probably run a lot cooler. 2 layers of titanium header wrap, and one layer of high temp silicone + fiberglass insulation has tamed it. All the aluminum standoffs also have high temp silicone on them. Exhaust runs through one plywood locker, but as you can see I’ve cut out the wood and replaced with aluminum and generous amount of high temp silicone on bottom side (picture 4 below). Thru hull is 28 inches above water line. Glad this project is complete. Works great.
View attachment 75355View attachment 75356View attachment 75357View attachment 75358View attachment 75359View attachment 75360
Here is my new install on a Grady 25’ Sailfish. I am 95% finished, just some tidying up to do. I underestimated how much of a pain in the butt this would be (making brackets, stand offs for the exhaust, etc) and my plans changed about 10 times along the way.
Managing the exhaust was tricky - it runs very hot, I suspect because the 24mm flexible stainless exhaust pipe is so thin. Thicker walled exhaust pipe would probably run a lot cooler. 2 layers of titanium header wrap, and one layer of high temp silicone + fiberglass insulation has tamed it. All the aluminum standoffs also have high temp silicone on them. Exhaust runs through one plywood locker, but as you can see I’ve cut out the wood and replaced with aluminum and generous amount of high temp silicone on bottom side (picture 4 below). Thru hull is 28 inches above water line. Glad this project is complete. Works great.
View attachment 75355View attachment 75356View attachment 75357View attachment 75358View attachment 75359View attachment 75360
Sailfish25
Member
Trotac in Victoria. It is intended for a 28mm exhaust used for a Wallas stove. It is about $18 per foot, so adds up fast but worth it.Where did you get the high temp silicone + fiberglass insulation and what diameter did you use?
It is a perfect fit for the 24mm exhaust that the Chinese heaters have, once you put a layer or two of header wrap on first.
Offshore
Member
Thanks for the info, it’s nice that they sell it buy the foot.Trotac in Victoria. It is intended for a 28mm exhaust used for a Wallas stove. It is about $18 per foot, so adds up fast but worth it.
It is a perfect fit for the 24mm exhaust that the Chinese heaters have, once you put a layer or two of header wrap on first.
Broadwater
Member
View attachment 75354
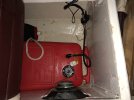
Fuel system started today.
1/4” marine rated hose to 1/8” ball valve (shut off) to 1/4 OD copper tube with compression fittings. More photos coming soon.
Hi Sparrow, I have been thinking about using a similar fuel tank with a Planar heater. How did this work out? Were you able to use the fuel pick up which came with the tank?View attachment 75354
Fuel system started today.
1/4” marine rated hose to 1/8” ball valve (shut off) to 1/4 OD copper tube with compression fittings. More photos coming soon.
sir-vivor
Well-Known Member
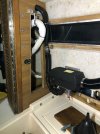
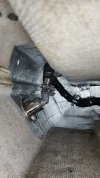
Good Job Sparrow, glad to see you got it going, I'm still at my exaust and heat barrier stage next it's the fuel and electric then venting to the windows, cuddy and one at the knee area in the helm. Hers a few pics of mine . Again Great work and thanks for your sharing (had mine fired up on the bench for 2 hours and worked great with thanks to advise from Fog Ducker and Ship Happens as back up )Well finished this project up yesterday and I’m super happy with the results. Exhaust pipe is cool enough to grab even after running for over an hour. It puts out enough heat yo keep the cabin warm and the windshields clear.
I tried to keep the ductwork as simple as possible.
View attachment 75546
Attachments

sparrow139
Active Member
It works great. I used a Yamaha male/female quick disconnect 1/4” so I can Remove the tank easily to re fuel.Hi Sparrow, I have been thinking about using a similar fuel tank with a Planar heater. How did this work out? Were you able to use the fuel pick up which came with the tank?
the tank has an internal standpipe that it draws from. No issues at all. I probably have around 10-15 hrs run time on the heater
Broadwater
Member
It works great. I used a Yamaha male/female quick disconnect 1/4” so I can Remove the tank easily to re fuel.
the tank has an internal standpipe that it draws from. No issues at all. I probably have around 10-15 hrs run time on the heater
Broadwater
Member
Thanks for the info.I like the idea of removing the tank to refuel.