Another build thread - Silver Creek Marine 23' Hard top

Silvercreek

Active Member
Hi everybody

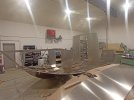
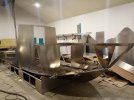
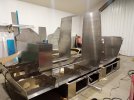
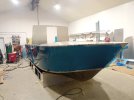
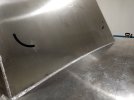
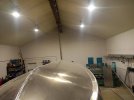
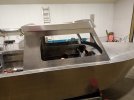
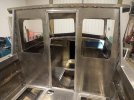
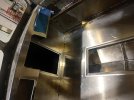
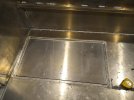
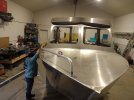
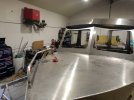
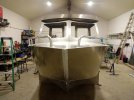
I've been lurking for a long time but I think this is my first post. I've been looking and enjoying some of the build threads on here and thought I would post my own of my latest boat build. My company is Silver Creek Marine in Salmon Arm, I figured this would help get me some exposure, hope that's allowed lol. This boat is being built on spec so if anyone is interested in buying let me know. I have a new mercury 200 hp 4 stroke that I will be rigging the boat with. Feel free to post any criticism or different ideas you might have, I'll try not too get too offended lol! The boat is nearly done the fabrication phase, I've got a few more days left. I'm trying to decide on if I should do any paint, vinyl wrap, hull liner, etc, and what if anything I want to put down for floor covering material.

Ok So I'll post a few pictures with a brief description of what's going on. I'm not sure how many pictures can be posted on what post, so I guess I'll find out now.

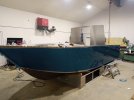
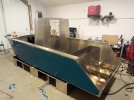
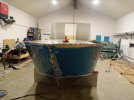
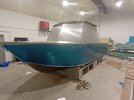
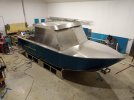
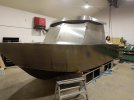
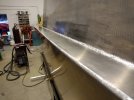
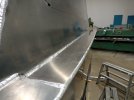
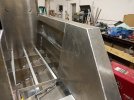
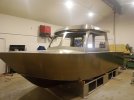
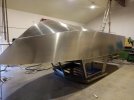
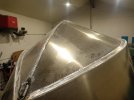
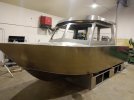
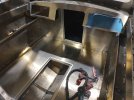
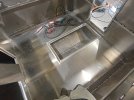
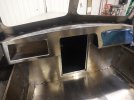
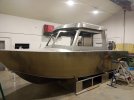
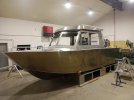
Here's some basic specs on the boat:
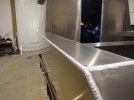
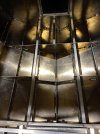
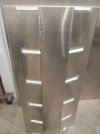
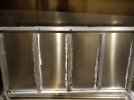
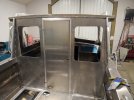
Bottom plate - 1/4" 5086
Sides, gunnels, cab - 3/16" 5086
Deadrise: 17 degrees stern, 18.5 degrees mid ship, 37 degrees at bow
Length overall - 23'
Beam - 8'6"
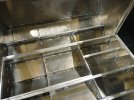
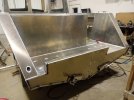
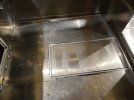
Rear deck length - 61" + 17" for box at the back (sink, storage, etc)
Length inside cab - 78"

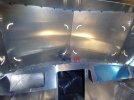
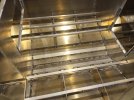
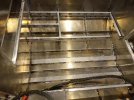
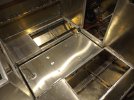
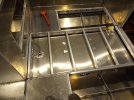
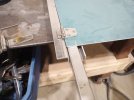
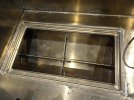
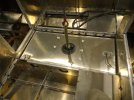
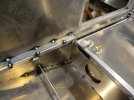
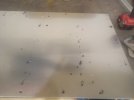
First couple pics here are of a few computer renderings, and the CNC cut pieces of aluminum

pen.jpgrendered 1.jpg20220204_111400_HDR.jpg20220204_182152_HDR.jpg20220204_182159_HDR.jpg20220204_182218_HDR.jpg
 
First post was a success!
This is the fun part, got the majority of the frames and hull plates tacked up. Cabin sides and roof tacked on
 

Attachments

  • 20220214_174412_HDR.jpg
    20220214_174412_HDR.jpg
    262.9 KB · Views: 207
  • 20220214_174438_HDR.jpg
    20220214_174438_HDR.jpg
    296.9 KB · Views: 200
  • 20220214_174502_HDR.jpg
    20220214_174502_HDR.jpg
    301.5 KB · Views: 195
  • 20220215_175454_HDR.jpg
    20220215_175454_HDR.jpg
    235.5 KB · Views: 180
  • 20220215_175505_HDR.jpg
    20220215_175505_HDR.jpg
    231.3 KB · Views: 175
  • 20220215_175529_HDR.jpg
    20220215_175529_HDR.jpg
    271.8 KB · Views: 173
  • 20220215_175547_HDR.jpg
    20220215_175547_HDR.jpg
    264.1 KB · Views: 176
  • 20220216_164202_HDR.jpg
    20220216_164202_HDR.jpg
    219 KB · Views: 172
  • 20220216_164242_HDR.jpg
    20220216_164242_HDR.jpg
    215.6 KB · Views: 167
  • 20220216_164257_HDR.jpg
    20220216_164257_HDR.jpg
    290.5 KB · Views: 212
So looks like 10 pictures is the limit for 1 post. I got to say I'm impressed with how well the forum handles uploading pictures. Some forums I've been on were terrible.

Here we have the inspectors checking on the progress of the boat. Also go the visor tacked on. The pipe at the back of the boat is a drain for the sink. Started some welding
 

Attachments

  • 20220219_172718_HDR.jpg
    20220219_172718_HDR.jpg
    169.1 KB · Views: 253
  • 20220219_172833_HDR.jpg
    20220219_172833_HDR.jpg
    284.4 KB · Views: 238
  • 20220219_173228_HDR.jpg
    20220219_173228_HDR.jpg
    283.4 KB · Views: 220
  • 20220221_163519_HDR.jpg
    20220221_163519_HDR.jpg
    246.6 KB · Views: 202
  • 20220222_180131_HDR.jpg
    20220222_180131_HDR.jpg
    163.6 KB · Views: 198
  • 20220222_180144_HDR.jpg
    20220222_180144_HDR.jpg
    199.3 KB · Views: 193
  • 20220223_165231_HDR.jpg
    20220223_165231_HDR.jpg
    252.2 KB · Views: 184
  • 20220223_165235_HDR.jpg
    20220223_165235_HDR.jpg
    262 KB · Views: 180
  • 20220223_165251_HDR.jpg
    20220223_165251_HDR.jpg
    235 KB · Views: 182
  • 20220223_165314_HDR.jpg
    20220223_165314_HDR.jpg
    323.6 KB · Views: 249
Got the windows cut out. Lots of welding... Added some channel to stiffen the area when the gas tank will sit. Flipped the boat over for welding the bottom. The one picture show the welding prep. The chines are welded on the inside of the boat first. Then from the outside I back grind all the way down to sound metal (ie all the way to the weld on the inside). This gives the joint 100% penetration for maximum strength. The boat has a center vertical keel, essentially a piece of flatbar that runs the entire length down the center were the 2 halves join together. This is also "fillet" welded from both sides, creating a stronger connection the bottom plate itself. In the last 2 pictures I decided to modify the frames a bit so that I could add some hatches. Its something I didn't think about enough in the design stage, and wish I had. In the future I will spread apart the 2 cross frames at the back for hatches.
 

Attachments

  • 20220224_112658_HDR.jpg
    20220224_112658_HDR.jpg
    233.3 KB · Views: 171
  • 20220224_124234_HDR.jpg
    20220224_124234_HDR.jpg
    352 KB · Views: 166
  • 20220225_151211_HDR.jpg
    20220225_151211_HDR.jpg
    260.5 KB · Views: 155
  • 20220226_114734_HDR.jpg
    20220226_114734_HDR.jpg
    264.1 KB · Views: 150
  • 20220301_160243_HDR.jpg
    20220301_160243_HDR.jpg
    306.5 KB · Views: 146
  • 20220301_160250_HDR.jpg
    20220301_160250_HDR.jpg
    243.5 KB · Views: 148
  • 20220301_190525_HDR.jpg
    20220301_190525_HDR.jpg
    155.6 KB · Views: 147
  • 20220301_191215_HDR.jpg
    20220301_191215_HDR.jpg
    259.3 KB · Views: 149
  • 20220302_173747_HDR.jpg
    20220302_173747_HDR.jpg
    199.5 KB · Views: 144
  • 20220303_180600_HDR.jpg
    20220303_180600_HDR.jpg
    384.4 KB · Views: 171
I had previously test fit the tank and discovered it was sitting to high. I decided I would raise the floor to accommodate the fuel tank rather then build or modify the existing tank. The tank was built before I started putting the boat together, while I was waiting on parts. I'm not sure where I messed up, but I was constantly revising my cad drawings and that's probably the reason. In hindsight I should have run the floor from the stern swim deck area) to the cab at the same level. The fuel tank is 265 liters (70 gallons), I will have to double check that. The one picture shows the hatch design I've come up with, I plan to run a gasket around the inside lip and I think they should be mostly water tight. Didn't really leave myself a lot of room for running the fuel fill hose, In truth I got lucky it fit! These are the kind of details that start taking more time then building the actual hull itself.
 

Attachments

  • 20220304_120802_HDR.jpg
    20220304_120802_HDR.jpg
    362.6 KB · Views: 151
  • 20220304_122637_HDR.jpg
    20220304_122637_HDR.jpg
    357.5 KB · Views: 146
  • 20220304_142828_HDR.jpg
    20220304_142828_HDR.jpg
    232.3 KB · Views: 149
  • 20220304_142911_HDR.jpg
    20220304_142911_HDR.jpg
    328 KB · Views: 141
  • 20220304_192959_HDR.jpg
    20220304_192959_HDR.jpg
    227 KB · Views: 140
  • 20220305_090020_HDR.jpg
    20220305_090020_HDR.jpg
    159.2 KB · Views: 132
  • 20220305_090045_HDR.jpg
    20220305_090045_HDR.jpg
    254.8 KB · Views: 130
  • 20220305_135505_HDR.jpg
    20220305_135505_HDR.jpg
    394.5 KB · Views: 154
Some of the pictures got out of order, too many to chose from. In this first picture I've glued some pieces of plastic to the fuel tank where it will sit on the pieces of channel. The reason for this is to allow any bilge water to pass under the tank and not be trapped between the tank and channel. This prevents crevice corrosion from making a hole in the tank. Got the floor and hatch opening installed in the cab, aswell as in the bow area of the boat. While its not a true cuddy there is room enough for one person to lay cross wise if they wanted too. Not the most comfortable as the floor has a bit of slope to it, which will just be worse in the water. While its possible to have a cuddy on this size of boat the cab needs to be pushed back and doesn't leave much room either in the cab and / or the back deck area. In my opinion the cuddy should be left for the 25'+ boats.
 

Attachments

  • 20220304_085229_HDR.jpg
    20220304_085229_HDR.jpg
    118.9 KB · Views: 110
  • 20220304_092429_HDR.jpg
    20220304_092429_HDR.jpg
    368.7 KB · Views: 106
  • 20220304_092434_HDR.jpg
    20220304_092434_HDR.jpg
    329.8 KB · Views: 104
  • 20220307_130508_HDR.jpg
    20220307_130508_HDR.jpg
    323.6 KB · Views: 97
  • 20220307_175459_HDR.jpg
    20220307_175459_HDR.jpg
    337.1 KB · Views: 97
  • 20220307_175518_HDR.jpg
    20220307_175518_HDR.jpg
    278.8 KB · Views: 99
  • 20220307_180430_HDR.jpg
    20220307_180430_HDR.jpg
    103.5 KB · Views: 99
  • 20220308_125409_HDR.jpg
    20220308_125409_HDR.jpg
    312.4 KB · Views: 102
  • 20220308_180030_HDR.jpg
    20220308_180030_HDR.jpg
    336.5 KB · Views: 99
  • 20220308_180050_HDR.jpg
    20220308_180050_HDR.jpg
    217.3 KB · Views: 115
Nothing much new in the first few pictures. The later pictures show how I built the hatch covers. I wanted a more then just the edge of the hatches bent down like you see on a lot of boats. I decided 1" square will work well. If I was to weld these pieces on solid they would be so warped that they would just be garbage after. I decided to use sikaflex and screws to build the hatch covers. They should be just as strong as welding without all the warpage from heat. The downside to the sikaflex? It's an absolute mess and gets on everything. Worse yet is the supplier only had black in stock at the moment.
 

Attachments

  • 20220308_180058_HDR.jpg
    20220308_180058_HDR.jpg
    203.7 KB · Views: 127
  • 20220308_180112_HDR.jpg
    20220308_180112_HDR.jpg
    288.4 KB · Views: 123
  • 20220308_180123_HDR.jpg
    20220308_180123_HDR.jpg
    330.3 KB · Views: 116
  • 20220308_180133_HDR.jpg
    20220308_180133_HDR.jpg
    246.5 KB · Views: 109
  • 20220308_180141_HDR.jpg
    20220308_180141_HDR.jpg
    296.1 KB · Views: 106
  • 20220310_161944_HDR.jpg
    20220310_161944_HDR.jpg
    335.8 KB · Views: 105
  • 20220310_162034_HDR.jpg
    20220310_162034_HDR.jpg
    323 KB · Views: 126
  • 20220310_162113_HDR.jpg
    20220310_162113_HDR.jpg
    175.6 KB · Views: 122
  • 20220311_111547_HDR.jpg
    20220311_111547_HDR.jpg
    143.4 KB · Views: 119
  • 20220311_112414_HDR.jpg
    20220311_112414_HDR.jpg
    287.5 KB · Views: 129
Last few pictures. Test fitting a railing for the bow and got a few other handles tacked on. Also got the cabin door installed. I'll add a few more hinges yet and need to cut out a window. So this is pretty much where I'm at. Whats left to do is build a door for the transom, one more hatch left to build, make a cover for the sink, build the bow rails, and install all the hatches. I think that's about it, although it seems every time I look around I find something else that needs to be done yet. As I said these details take longer then building the hull. I'm hoping a few more days of fabrication and then I'll be into the rigging and wiring. I have sliding windows from AJR on order and they are supposed to be done at the end of the week. I've already ordered seats, all my electrical parts, hoses, fitting, hydraulic steering, etc. All the parts needed to finish the boat. Its so hard to get anything these days I wanted to make sure I would have it all ahead of time. I've also got my own CNC router that its possibly being installed at the end of the week, and I need to move some stuff around to make room for that. It's going to be a busy week.
 

Attachments

  • 20220312_111136_HDR.jpg
    20220312_111136_HDR.jpg
    303 KB · Views: 207
  • 20220312_111147_HDR.jpg
    20220312_111147_HDR.jpg
    289.1 KB · Views: 207
  • 20220312_165711_HDR.jpg
    20220312_165711_HDR.jpg
    290 KB · Views: 197
  • 20220312_171559_HDR.jpg
    20220312_171559_HDR.jpg
    243.2 KB · Views: 206
Nice work. I love seeing a new build starting from scratch. Also like that you have your inspectors keeping tabs on you every step of the way. I hate it when inspectors come near the end and point out all of your screwups. :eek: :eek:
 
Last few pictures. Test fitting a railing for the bow and got a few other handles tacked on. Also got the cabin door installed. I'll add a few more hinges yet and need to cut out a window. So this is pretty much where I'm at. Whats left to do is build a door for the transom, one more hatch left to build, make a cover for the sink, build the bow rails, and install all the hatches. I think that's about it, although it seems every time I look around I find something else that needs to be done yet. As I said these details take longer then building the hull. I'm hoping a few more days of fabrication and then I'll be into the rigging and wiring. I have sliding windows from AJR on order and they are supposed to be done at the end of the week. I've already ordered seats, all my electrical parts, hoses, fitting, hydraulic steering, etc. All the parts needed to finish the boat. Its so hard to get anything these days I wanted to make sure I would have it all ahead of time. I've also got my own CNC router that its possibly being installed at the end of the week, and I need to move some stuff around to make room for that. It's going to be a busy week.
Are you going to keep that bow rail kinked like that? Or give it a curve to match the shape of the bow? Princess Auto has a fairly inexpensive tubing bender that would make that look nicer.
 
I was going to, I don't think it looks bad?

Is this the bender your talking about

Have you used it on 1" aluminum pipe with success? There's certain things I will buy from process auto but I find usually most if it is junk and ends up being a waste of money. Better to save the money and buy a quality tool usually. Swag offroad has a nice looking unit I would like to get.
 

Attachments

  • 20220314_182038_HDR.jpg
    20220314_182038_HDR.jpg
    250 KB · Views: 159
  • 20220314_182053_HDR.jpg
    20220314_182053_HDR.jpg
    299 KB · Views: 155
What’s the price tag on a boat like this?
Good question. I figure I list it for around 110k and see what happens. That's turn key with a new 200 HP mercury, hydraulic steering, seats, sliding side windows, electrical done, wash down pump, wipers, etc etc. and tandem axle aluminum trailer.

Similar size hewsecrafts going for 115k new with 200hp. They're only 3/16 bottom and 1/8 side I think (also probably only 5052). Also probably plywood floor. But the factory boats do look nice with the paint job and vinyl flooring. This is where I wonder do I spend more money (and a lot of time) to finish it nice, paint or vinyl, some sort of covering on the inside. Something nice over the aluminum floor (ultradeck, vinyl, non skid)? I'm worried I just put a more money into it and don't really get anything out of it for the time. I'd love to hear any input on this
 
Back
Top