Project 'Bad Habits' Build

I would use West Systems 105 epoxy resin and 205 hardener and seal up the transom. Mix in a small amount of acetone to thin out the resin and the wood will absorb more of it into the grain. Pay attention to the outer edges exposed grain; that's where the water will come in if it can. That and the bolt holes for the out drive. Fill those with 3M 4200 when you are re-assembling.

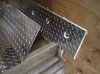
You can mix the resin+hardener with micro fibers to make a paste to make a water tight seal on that joint at the bottom. Not sure about the aluminum plate; never tried something like that before.
 
Then again I would have welded a vertical structural aluminum stringer system with major structural channels or something for the outdrive then clad the whole thing in with a sheet of 1/4" plate on the inside LOL!

I actually talked about this with a buddy, but cost and labor came to be the factor. I think I will do both epoxy and aluminum sheet, just for the extra mile.

AlanF. It is a mercruiser assembly and drive. I made sure to use the same materials as the original transom, which was 1.5". Maybe this drive is different? Its an alpha gen2...
 
OK, picked up some West Systems 105 from Industrial Paints and Plastics here in Langley...great little product, easy application and such. 5 to 1 Resin to Hardener

applied it liberally on the face of the transom, around the edges, and anywhere I could paint it on...got the fast hardener so it should be workable tommorrow. Going to sink a few more bolts through the transom to make it a little more rigid.

Will hopefully be ordering my pumps and wash down next week, reinstalling the gas tank and lines...and laying floor by the end of the month I'm guessing...
 
Nice, did you get the pumps with the resin and hardener? Makes it super easy, one pump of each creates the 5-1 ratio. That stuff is awesome. It will stay good for years in your garage too.

What kind of bilge pumps are you going to get? I think I read that you were going to go for a pair of 750gph pumps for redundancy. My suggestion would be to get a small, automatic bilge pump say 500 gph that's purpose to automatically pump out any rain or small amounts of water. The second pump should be much larger, 1500GPH is a good size, and connected to a manual switch. The big pump is what you would use in an emergency or as a temp if the small one fails.

If you are stuck out in a storm and you are taking water over the bow or the sides those 500-750 gph pumps are useless. They can take 45 seconds or more to pump the water from a single wave out. (Ask me how I know this). In those case you want the bigger 1500 GPH+ pumps. On my boat I have a single 1500 GPH johnson pump that I would never leave port without.

Oh, and stay away from those cheap sea-sense pumps. They fail frequently in less than one season. Get a Rule or Johnson. The one crappy pump rule has is there 500 GPH auto pump which is supposed to not turn on if there is oil in the bilge. They have an almost 100% failure rate after 1 season or so I've read.

Cheers
 
Hey TS...thanks for keeping up with the thread!

Was going to go with Attwood pumps, as that is what came originally with the boat. Haven't read many reviews on them, but they were priced comparably to Rule, if I remember correctly. I like Attwood for their variety of pumps that best suited my application. The 750GPH pump was the largest they made for the 3/4" line. Any larger and I would need to increase the line Diameter, which is really no big deal at all....maybe something I should look into as the difference in cost is minute...

Oh I didn't get the resin 5 to 1 pumps, tho I wish I did, but I carefully removed the seal so I could put it back in place and reseal the canisters for the next small project...doesn't take long for the mixed product to tack up, thats for sure!
 
All Resin'd up...

pic of the resin'd transom...ready to keep moving, a lot of hardware to install and consider before I close up the floor!

But movin' along!

-FB-
 

Attachments

  • 0529121509a.jpg
    0529121509a.jpg
    80.9 KB · Views: 214
Back on track...

While I am waiting for my new sending units and gauges...with a whack of material on the shop floor, I figured I might as well turn it into boat floor material! I spent a few good hours making some tedious cuts (as the framing of my boat is not perfectly straight, close but a little off.

A few extra's I added were an aluminum splash guard at the base of the transom, as well as 2 access hatches on either side of the bilge area...so I can access the drain holes at the back of the boat easily, to clean an inspect. Also, if an aerator pump craps out I can access it quickly via the panel to replace or maintain it. I picked up a nice 6' stainless piano hinge to hinge the access panels, as well as the doghouse (once I build that...). There will be another aluminum wall installed at the transom to close up all the batterys, pumps and whatnot, that has also not been built yet.

a few pics give the whole scope of the floor, with a detailed pic of the splash guard and access panels.

Whatchy'all think? Finally a step where I see things coming together!

Cheers!

NICK -FB-
 

Attachments

  • 0612121523a.jpg
    0612121523a.jpg
    57.2 KB · Views: 258
  • 0612121524a.jpg
    0612121524a.jpg
    57.3 KB · Views: 243
  • 0612121524c.jpg
    0612121524c.jpg
    56.4 KB · Views: 254
  • 0612121524b.jpg
    0612121524b.jpg
    43.7 KB · Views: 235
Looks great! Nice job. It's going to look a lot better covered with salmon blood though..

Too specific...Halibut and Tuna bleed way more :)

I was doing reading on the contamination thread.... Since stainless and aluminum don't mix well...what can be recommended when anchoring the floor to the hull supports? Would galvanzied self tapping screws be better than a stainless self tapper? As well, what are thoughts on putting one sided adhesive foam strips on the hull supports under the floor to dampen and elimante vibration and rattling between anchor screws?

I've gotta put the main tank back in, add some removable crossmembers, cut some access hatches to get at the tank switches, and then I'm pretty sure I can permanently anchor the floor and finally move onto the cabin construction. Putting the bilges and washdown on hold as I can install all those later since they are in the engine bay, and I've made the access in the floor so I can instal the aerators and washdowns at a later date..

The stainless to aluminum you will never get away from because that is all that you can use for fasteners. I use Tefgel or Tuffgel all the way when ever I put a stainless fastener into my gal. It helps but does not totally eliminate the corrosion factor of the two metals. Anything you can do to eliminate dissimilar metals is a bonus. Whip out that chaulk and seal the gap around those shapely sides dude. Let it all flow to the rear lol.

Cheers,
John
 
Whip out that chaulk and seal the gap around those shapely sides dude. Let it all flow to the rear lol.

Cheers,
John

You mean just silicone the edges and screw it down? I did plan to seal the seams and edges so it does all run to the back...I'm trying to think of a design to elevate the steering pump and batteries off the floor with some sort of bracket so it is out of the way of any errant water flow. Once I build the second wall the doors to access the batteries ect, no water should penetrate any further regardless, and it all should bail into the engine bay long before reaching the transom...
 
foam strips

don't know about putting foam strips between supports and floor --what if it wears through, and it starts to rattle then you have to pull it up again. I would probably use teflon strips they are pretty strong ---yes i would silicone the edges to keep any water out I could, wipe everything with Iso first so it sticks good and mask it first so it looks pretty --use Dow 795 --let me know if you need some. Could probably help with the teflon too.

S
 
While I am waiting for my new sending units and gauges...with a whack of material on the shop floor, I figured I might as well turn it into boat floor material! I spent a few good hours making some tedious cuts (as the framing of my boat is not perfectly straight, close but a little off.

A few extra's I added were an aluminum splash guard at the base of the transom, as well as 2 access hatches on either side of the bilge area...so I can access the drain holes at the back of the boat easily, to clean an inspect. Also, if an aerator pump craps out I can access it quickly via the panel to replace or maintain it. I picked up a nice 6' stainless piano hinge to hinge the access panels, as well as the doghouse (once I build that...). There will be another aluminum wall installed at the transom to close up all the batterys, pumps and whatnot, that has also not been built yet.

a few pics give the whole scope of the floor, with a detailed pic of the splash guard and access panels.

Whatchy'all think? Finally a step where I see things coming together!

Cheers!

NICK -FB-

Looks great, love the checker plate floor, that will last a lifetime.
 
Yes, your project looks awesome. Lots of work, but it's worth in the end... nice floor:)
 
Bling Bling!!...wow that floor sure cleans everything up!! definitley gives some prespective to the layout and size...lookin good bud!!
 
....SON OF A B****!!!!

for those builders around...ever have one of those days where nothing goes right, everything is frustrating!..ya its one of those!

and for F*sakes FB...measure twice, cut once!!...damn gas lines!

time to put the tools down, and beer up! Gaaawd damnit!
 
....SON OF A B****!!!!

for those builders around...ever have one of those days where nothing goes right, everything is frustrating!..ya its one of those!

and for F*sakes FB...measure twice, cut once!!...damn gas lines!

time to put the tools down, and beer up! Gaaawd damnit!

Haha, yup.. we all have those days... i seem to have them more often then not... thus, Im not a builder or a even good fixer upper... good to hear Im not the only one reaching for a beer when things get tough...
Stick with it, its going to be great..
 
....SON OF A B****!!!!

for those builders around...ever have one of those days where nothing goes right, everything is frustrating!..ya its one of those!

and for F*sakes FB...measure twice, cut once!!...damn gas lines!

time to put the tools down, and beer up! Gaaawd damnit!


I live those dayz all the time, Nick
For me that is time too put the wobblie down & focus on the tape measure.................lol

Great see'n ya bro hope I can assist in any way

Len
 
Back
Top