Nahmintbay
New Member
YesIs the alpha from a v8?
YesIs the alpha from a v8?
Ping pong balls are cheap lol. Fill the whole benches with them.Yes. My plan is to have it wrapped in plastic and easily removable/replaceable. The boat itself is marine plywood core sandwiched between epoxy resin fiberglass.
At least just keep an eye on it, could have been upgraded already. I want to say they put a metal sleeve in, old style is threaded plastic.Here's the kit comes with 8,9.9 and 15hp gaskets
Didnt know about this top cover issue?
I'll look into that now, thanks View attachment 105937


lol, that is manually flooding it. same idea.I had a similar 9.9 yamaha without manual choke. To choke it you moved the throttle back and forth fully and quickly around 10 times before trying to start it.
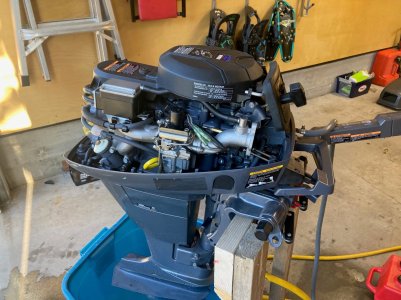
Looks super clean for $50. Nice find if the fix is that simple.Picked up an old Yamaha 9.9 four stroke that wasn't running for $50 and a pack of beer. Built a stand in the garage, and started to tear into it to see what was up.
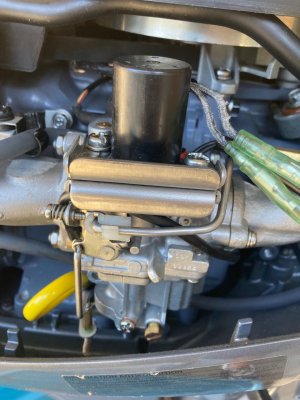
Step 1: Pull the carb, disassembled - cleanout any varnish, blew out the jets. Re-assembled. (pretty easy on this model)
Still won't start, but will fire for a few seconds if I manually toggle the throttle linkage on the side of the carb before pulling the starter cable (however manually throttling up when it is running does nothing). Starts, runs 5 seconds, dies - but not rough. My guess is choke related.
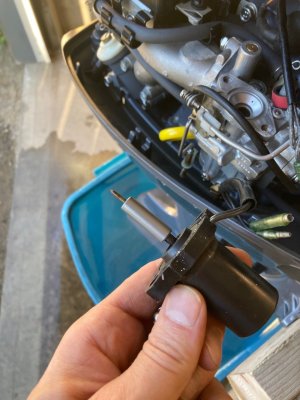
Step 2: This model doesn't have a manual choke - it has a solenoid valve on top of the carb. Pulled the solenoid, put a piece of tape over the opening to simulate full choke. Fingers crossed - starts first pull - idles nicely. After about 30 seconds, I peel back the corner of the tape to simulate pushing the choke in. Still idles fine. Solenoid seems to be the source of the problem. Looks like water pump is dead as well.
Now just need to order parts, and see if anything else comes up.
We'll see. Looks like around $130 for the new solenoid valve plus probably another $65 for the water pump kit. At that point I get to find out if its actually any good, but if I can get a running early 2000s 4-stroke for around $250 (all-in), with some sweat equity - that's a pretty good deal in my books.Looks super clean for $50. Nice find if the fix is that simple.


So to my complete surprise, this showed up at my dock tonight. Feels good to know the summer season is starting!
View attachment 106424
I almost pulled the plug on launching tonight—- I got half-way to the storage facility where my boat is parked and realized I’d forgotten my tow ball. Shiat…..I do a Youey and on the way back to my house I see a serious motorcycle accident—the bike was upside down on the driver…there were people starting to gather so I kept on driving….I could see traffic backing up in the lane I’d have to drive once I got the tow ball……don’t launch…don’t launch said the guy in the jester suit on my shoulder….but we have a big holiday coming up and I knew I had to bust a move so I’d have the ramp to myself with an incoming tide…I stuck a sock in the jester’s mouth and kept driving
I get the boat launched but funny thing….I can’t shake it off the trailer…yup…retaining straps still attached. Pull it back out, get the straps off, tie the bow line to the dock rail, shake the boat off, pull forward but the boat is following the trailer….yup, bow line hooked the bunk and the trailer tire ran over it…
Throughout all this I was thanking the Lord I was completely 100% alone for this self-inflicted gong show….but I got her done and the boat ran like a sewing machine back to my dock
Pulling the four 6 volt house batteries (258lbs!!!) and replacing with an 80 lb LiFePo so far seems to be a good move. I ran at 4,100 RPM this evening and fuel burn was 1.40-ish….I recall back in the days with all that weight in the stern I don’t think I would have done better then 1.25–1.30 at that RPM
Anyway, sure feels good to get her wet again!
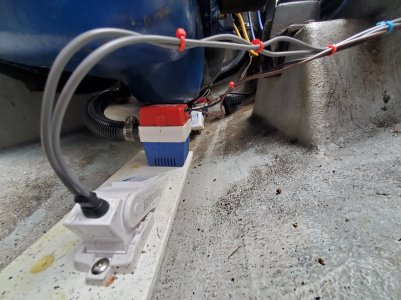
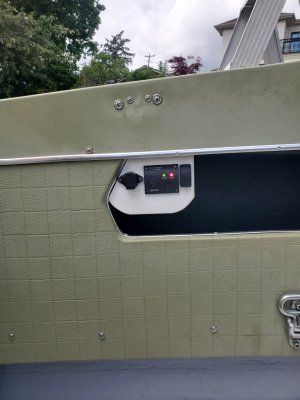
Never have enough pumps, if you ever taken on water you know what I mean, I have 3 hooked up and extra 1500 with gator ends as a extra lol, and insurance made me put the high water alarm after my first survey 6 year ago. Good jobWhat started out as replacing a float switch ( which wasn't needed as it turned out...I'm an idiot..don't ask) turned into adding a second float switch with a back up bilge pump with its own switch wired to its own battery as well as a high water bilge alarm.. and also adding an indicator light at the dash for the primary pump. Also replacing the primary pump with a new pump. Probably a little overkill but what the hey.
I also went down a rabbit hole on bilge pump switches and wiring. That's a whole other thread.