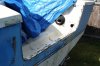
Thanks for the tips so far. I have a respirator in the truck tool box already, to be worn for all grinding work. I am planning to pull out the engine before I do any more removal of floor or an other structure. Do I need to worry about the hull collapsing or buckling as it sits on the trailer? Should I screw some braces across the gunnels before I rip out the rest of the floor?
I plan to encapsulate the stringers in resin and glass, the old ones seemed open on the top and when the floor sacked out, it allowed water to get in to the top of the stringers.
Probably going to use an LVL as stringer material, and likely bed the stringer to the hull with construction adhesive before it gets tabbed into place. Any advice on best place to buy fibreglassing suplies in the Comox valley. Is Industrial plastics the only game in town?
If I were you I would use West systems epoxy resin and hardner for the job. It's more expensive than poly resin but is much stronger, little to no fumes, better water resistance and more margin of error allowed. You can get it at West Marine. I used the 105 resin and 205 hardner. It's amazing stuff and strong! 13000 PSI breaking strength or something like that.
For bonding the stringers in place the best material is epoxy thickened with micro fibers; which you can also get at WM. WM sells fiberglass too but there are a bit expensive. If you can find an industrial plastic to by your glass then that's your best bet.
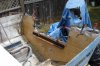
What he said about bracing the hull is good advice. Also, make sure you leave the outer skin of your transom intact; it will help to keep the boats shape when everything is out.
All you need for the stringers is 3/4" exterior grade plywood. Bond them to the hull with thickened epoxy and encapsulate them in layers of glass and epoxy. I used 8oz fiberglass cloth and 24oz woven roving for mine. use the same 3/4" plywood for your transom but use two layers. All the wood that you use in the boat should be bone dry and apply a thin coat of epoxy resin & hardner to all surfaces. The wood will soak it up; keep applying it until the entire outer surface is covered.
Get yourself a bunch of pairs of nitrile gloves, small mixing buckets, brushes, rollers, spreaders etc. You will use a lot so buy cheap stuff.
You will need to do the job in this order:
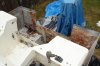
1. Remove engine and everything else that will get in the way.
2. Remove floor
3. Remove cap of boat
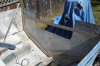
4. Remove stringers - try and keep parts or all of the old stringer if possible to use as a model to cut the new ones.
5. Remove transom. (do this from the inside out and leave the outer skin intact.) again, try and keep parts or all of the old transom if possible to use as a model to cut the new one.
6. Grind EVERYTHING down to glass..this is the itchy / hot / brutal / backbreaking part. It will take a long time and it will suck.
7. Cut new transom from plywood, ensure it fits into the hull then coat with fiberglass resin. Let it dry.
8. Mix up a large batch of thickened epoxy and smear it all over the inner skin of the transom.
9. Place the new transom wood in the hull and clamp it down with c-clamps. You want epoxy to sqeeze out the edges here. Clean up excess.
10. Apply more thickened epoxy to the inner side of the new transom and place the second piece in. Clamp this piece to the first one as well.
11. Let it set. Then fiberglass the inner side of the transom to the hull.
12. Cut stringers, fit to hull, coat with epoxy.
13. Mix more thickened epoxy and use that to bond the stringers into the hull. Use braces if needed to keep them in the correct place.
14. Glass the stringers to the hull.
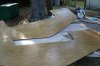
15. Cut floor, fit into hull, coat with epoxy.
16. Apply a layer of glass to what will be the bottom of the floor. Use 18oz or 24oz woven roving for this to give the deck strength.
17. The floor / deck should sit on top of the stringers and touch the outer edges of the hull. Use thickened epoxy again to bond the floor to the stringers and sides of hull.
18. Glass the deck to the hull at the edges and glass the top of the deck.
19. Sand out any rough areas, paint, replace cap, replace motor and go fishing.
I think that covers a lot of it. That's essentially what I did on my 17' boat last year. It's worked out great and is solid as a rock. Much lighter now too then it was before with all the rotten wood and heavy glass.
Hope that helps.
Cheers

") You will want to replace that second stringer while you are in there. Usually if one is rotten then they are all suspect.
You will want to replace that second stringer while you are in there. Usually if one is rotten then they are all suspect.