Seasport cabin floor project etc

MRWood

Well-Known Member
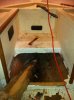
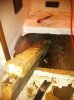
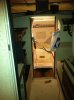
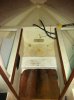
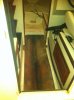
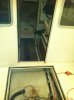
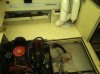
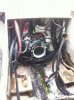
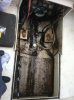
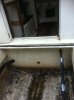
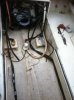
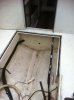
"In the beginning".... it all started when I noticed that the floor in the entrance to the cuddy was sounding brittle and crackly. I knew there was water getting in under the floor and I suspected it was seeping in through the bulk head. I had an access port in the floor so I could see water was getting trapped under the cabin floor but I kept it dry as best as I could. Turns out I wasn't keeping it dry enough as discovered by the brittle floor. I started to poke and prod which turned into tearing and ripping :) And so starts a new project that always leads to a new and exciting adventure of learning.
 

Attachments

  • Nov 3 2014 boat work etc 013.jpg
    Nov 3 2014 boat work etc 013.jpg
    91.4 KB · Views: 1,003
Last edited by a moderator:
As you can see from the 1st pic there is a center joist that ran down the middle of the floor and attached to the bulk head for support of the floor. That piece had dry rotted so I proceeded to tear it out. The piece was so brittle that I was able to snap it in two where it entered the cuddy. Looks pretty nasty.
 

Attachments

  • Nov 3 2014 boat work etc 014.jpg
    Nov 3 2014 boat work etc 014.jpg
    90.5 KB · Views: 989
  • Nov 3 2014 boat work etc 015.jpg
    Nov 3 2014 boat work etc 015.jpg
    90.4 KB · Views: 998
Last edited by a moderator:
Cleaned out the area. As you can see from the water mark on the hull floor, water had been sitting up front which was hard to see from my access port which was located at the entrance to the cabin. Next step was to cut out the main cabin floor.
 

Attachments

  • Nov 3 2014 boat work etc 016.jpg
    Nov 3 2014 boat work etc 016.jpg
    89.3 KB · Views: 980
  • Nov 3 2014 boat work etc 018.jpg
    Nov 3 2014 boat work etc 018.jpg
    94.2 KB · Views: 981
Cabin floor is now cut out. Only issue to speak of was the center floor joist and under side of the floor. The upper sides are all solid and no sign of water damage. The 2nd picture shows the outside of the cabin and fuel tank. The fuel tank sits in front of the bulk head which seperates the bilge from the cabin.

From this point I proceeded to test the bulkhead leakage theory by adding water to the bilge and lowering the nose of the boat. As suspected, I could see water seeping in where the bulkhead attaches to the hull. Not a running river of water but fast enough to keep a steady supply of water going to the front of the boat.
 

Attachments

  • 006.jpg
    006.jpg
    92.3 KB · Views: 975
  • 005.jpg
    005.jpg
    90.9 KB · Views: 972
Last edited by a moderator:
From this point I knew I was going to have to take out the fuel tank in order to seal up the bulk head from the bilge side.
 

Attachments

  • 004.jpg
    004.jpg
    90.9 KB · Views: 972
Last edited by a moderator:
lol - those are the kind things that once you start poking around a little job becomes a huge job. Sometimes ignorance is bliss...
 
The problem is once you know its there it keeps eating at your brain. Best thing is to get at it do it right and get the peace of mind back. I have done little patch jobs before and convinced myself it was all good but didn't take long before more of the same showed up. Do it right ands its done.
 
It's true, ignorance can be bliss. When you realize there's an issue the bliss disappears :) Then I chase it down and usually go further than intended but in the end you're better off for it.
 
So then out comes the fuel tank, after syphoning out the 45 gallons into various fuel containers and vehicles. I then decide that I need to figure out how water is getting into the bilge. The uppder deck is sealed pretty well and deck is self bailing so very little water gets in to bilge from the top deck. I've not had the leg out and off and decide it might be a good time to check that out to see if there's leaks or any issues. It is then suggested that if I'm going to do that then I may as well pull the motor and check everything out. Since I haven't done this since I've owned the boat (owned it for coming up 5 years) I decide I would like to do that. Gives a guy a chance to check everthing out and make sure things are good and if not correct it before it becomes an even bigger issue. Also, what's a winter project without getting into deeper issues than originally intended. As an aside, please note that I am not the one removing the motor and leg, I'm the helper, general joe boy and student.

Here are the pics after fuel tank, motor and leg are removed.

I am assuming that the motor has never been pulled out of this boat. It is a 1992 so there was quite a lot of grease and grime in the bilge.
 

Attachments

  • Nov 3 2014 boat work etc 007.jpg
    Nov 3 2014 boat work etc 007.jpg
    94.5 KB · Views: 608
Here's a pic looking into the bilge. The 2nd pic shows that area were the fuel tank was and the bulk head that needs re-sealing. Major grease and grime that needs cleaning up so you can eat off it Lol.
 

Attachments

  • Nov 3 2014 boat work etc 008.jpg
    Nov 3 2014 boat work etc 008.jpg
    95.4 KB · Views: 611
  • Nov 3 2014 boat work etc 009.jpg
    Nov 3 2014 boat work etc 009.jpg
    96.3 KB · Views: 610
Here are the pics after the major clean up and scrape down. (Note to self, don't get bare hands in diluted bilge cleaner unless you want to lose one layer of skin over a 3-4 day period) I'm not sure I'm going to eat off of the floor but it's better than it was.
 

Attachments

  • Nov 3 2014 boat work etc 013 (2).jpg
    Nov 3 2014 boat work etc 013 (2).jpg
    94.8 KB · Views: 611
  • Nov 3 2014 boat work etc 014 (2).jpg
    Nov 3 2014 boat work etc 014 (2).jpg
    93.7 KB · Views: 610
Sorry that I don't have any pics of the motor just after it was pulled. It is in pretty good shape but did have to do few things other that pretty it up (has 1100 hours on motor, so still has plenty of life in it). Motor is a 4.3 litre V6. Removed belt pulleys and wire brushed them and re-painted and re-aligned pulleys. Way easier when the motor is out. I had been having issues with belts wearing down due to poor alignment. Which also gives off that awful black belt powder that can get everywhere. Also had the gimble bearings changed as they were pretty rough. Flex plate in the bell housing was also replaced. Changed alternator as it also felt rough to turn. Here is the motor after putting some lipstick on it.
 

Attachments

  • boat project 004.jpg
    boat project 004.jpg
    95.9 KB · Views: 608
Nice work MRW! All this extra work is really going to add up to a lot of peace of mind this summer on the water. Good on you.
 
Mr Wood after doing such a great Job have to ask how old are those manifolds and risers? if they are over 5 years old and original I would strongly urge you to replace them as your getting to the danger area if they havent. I switched mine over to what they call the dry fit.if you want more info drop me a pm and ill be glad to help you...

last thing you want is the manifold to go and have to do all this over again easy to do it now....

Wolf
 
Great blog Mr Wood. Your going to have a nice clean solid boat when you are done.
Keep the details coming
 
I have the same boat (same year too) but podded outboard. The only difference is I have a fish locker after the cabin bulkhead and then the fuel tank aft of that. It was recommended to me to put inspection hatches in the cabin floor to not only check on any water penetration into those sealed compartments. I also pull out the carpet and remove the inspection plates in winter to allow air flow below the floor. We put one just inside the door and the other just to the side of the front helm.
 
Hi Wolf....thanks for the heads up. The risers are only a few seasons old so they should be good for a few more seasons. I trailer the boat a lot so the boat is out of the water most of the time and system gets freshwater flush each time.
 
Profisher, it's nice to know someone who has the same boat. I may have to ask you the odd question from time to time. What area of the coast do you live? Good idea to have the two inspection plates. I was thinking of having the floor as two hatches that can be pulled up for some extra storage.
 
Back
Top